As Intel recently deprecated their ProSet tool for Windows 11, I had to find a solution to continue operating some computers which have to connect to multiple VLAN interfaces.
Right now those computers use a single NIC, connecting to a switch which has enabled VLAN tagging. Unfortunately (of fortunately?) most of our computers are currently running a realtek NIC. VLANs are currently configured using their Diagnostic Utility.
Fortunately (or in this case unfortunately?) our latest generation of hardware now comes with an Intel network chip. This change was pushing me into this new issue: How do I configure multiple VLANS under Windows 11 on an Intel NIC?
The Issue
Intel used to have a quite easy configuration for multiple VLANs in their advanced driver settings but as I already noted: The ProSet tool including the advanced driver functions has been discontinued by Intel. So now, I had to find a new way to solve that demand.
On Linux you can create virtual nics easily as the VLAN function is built into the network stack of the linux kernel but I knew that windows was not able to do similar – and I was wrong-ish.
Examining the advanced tab of my NIC, I’ve seen that setting a single VLAN ID is not hard, it can be done in advanced properties of the NIC or using powershell. In our case, as we need to operate on multiple VLANs things are different. There is no option to add a virtual NIC so I started tinkering.
The solution is Hyper-V
So after some research I found out, that Hyper-V is VLAN aware and you can use their network stack without installing and running the full hypervisor. Additionally you can create multiple virtual Host-NICs attached to a VLAN aware Hyper-V-Switch.
Sounds like Rocket science? It is actually quite straight-forward but you need to configure that using powershell.
Step 1: Installing the Windows components
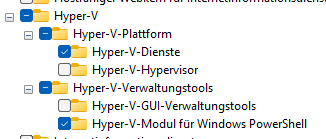
In the windows feature installation dialog, we have to install the two components called “Hyper-V-Services” and “Hyper-V-Module for Windows powershell”
After the setup is done, you have to reboot the computer.
Step 2: Setting up the vSwitch
Hyper-V automatically creates a “Default vSwitch” that you can not delete and unfortunately it is not VLAN-Aware. We will have to keep this one as it is and go ahead creating a second vSwitch. For this, we need to open up powershell as an administrator and enter the following commands.
Your host will lose it’s network connection – Do not do that remotely or with apps running.
# This will return a list of network adapters, find your physical NIC and note its "Name" - In most cases "Ethernet"
Get-NetAdapter

# This creates a new vSwitch named VLAN-vSwitch and bridging our physical NIC called "Ethernet". Also we allow to add virtual Host-NICs to this switch.
New-VMSwitch -name VLAN-vSwitch -NetAdapterName Ethernet -AllowManagementOS $true

# Hyper-V automatically creates a virtual NIC without a VLAN tag to keep the host online - Remove it, except you are using a Untagged/Tagged combination.
Remove-VMNetworkAdapter -ManagementOS -Name VLAN-vSwitch
We do now have a clean new VLAN-Aware vSwitch
Step 3: Setting up VLAN interfaces
# Now we create a new virtual Host-NIC and assign a VLAN tag 123 to it. Please note, that the interface name can be chosen freely. One might want to name them by purpose.
Add-VMNetworkAdapter -ManagementOS -Name "VLAN123" -SwitchName "VLAN-vSwitch" -Passthru | Set-VMNetworkAdapterVlan -Access -VlanId 123# You can now add as many virtual NICs as you need
Add-VMNetworkAdapter -ManagementOS -Name "VLAN456" -SwitchName "VLAN-vSwitch" -Passthru | Set-VMNetworkAdapterVlan -Access -VlanId 456# Finally, verify that all adapter are in place
Get-NetAdapter
Done
Thats all you need to do. You do noe have replicated the VLAN feature of Realtek Diagnostic Utility or Intel ProSet with windows “onboard-tools” and this solution should be compatible with any available NIC.
What do you think? Is this a clean solution or do you still preferr using other tools, if so – which?
I was recently confronted with the issue that I needed to move a running Proxmox Backup server to a new host. Along the migration I also needed to update the hostname to match the new concept. However, it does not really matter if you keep the hostname or not as fortunately PBS does not really care about it’s name.
Step 1: Research
As a senior admin I know you can usually find out anything you don’t know yet using google (ar any other search enginge out there). This time however I had a hard time. Looks like virtually nobody tried to migrate a PBS yet – or maybe the fact tht it is so easy leads to noboy writing the process down.
Okay, let’s do it on our own!
The Facts
Currently PBS is running an an “old” Proxmox VE host – and I mean on the physical host. We are migrating this PBS installation to a dedicated host, a VM on Hetzner’s cloud this time. As the PBS is only occasionally taking load and the backup performance does not really matter for our project, I chose a CX21 VM with 2 vCores and 2GB of RAM. The 40 GB HDD space are enoght for the OS and PBS’s own files. Additionally a Hetzner Storage Box is available to be used as the actual datastore.
In this case the chunks (the actual backed up files) have already been stored to the Storage Box. This means in this blog post I will not migrate the actual data but if you need to, it is as simple as rsyncing the data (rsync -azh source target) from one place to the other, just take care that the mount path is the same on the new server and stop the services on both servers before migrating!
Step 2: Preparation
The Cloud VM
First of all, I booked a CX21 cloud VM from Hetzner located in the same datacenter as the storage box resides. This is very important! Using a VM in FSN1 and storage box in HEL1 has very bad performance. I mean performance like when you’re driving right behind a farm tractor on a highway.
I chose Debian 11 (and you should do so, too). Right after the setup completed, I logged in using SSH and edited /etc/hostname to include or FQDN hostname – don’t forget to add a DNS entry!
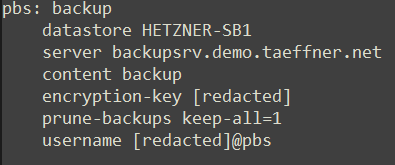
As mentioned, our chunk data is stored on a Hetzner Storage box. I copied the respective line from fstab from the old server to the new one and created the mount path using mkdir /mnt/hetzner-sb1 in my case. For reference, this is what it looks like now (username/password redacted):
Then I mounted the box using mount /mnt/hetzner-sb1 and verieifed by running an ls /mnt/hetzner-sb1
Install Proxmox Backup Server software
We need to do a clean install as docuemnted here. The commands are simple and reliable:
Trust the repository key: wget https://enterprise.proxmox.com/debian/proxmox-release-bullseye.gpg -O /etc/apt/trusted.gpg.d/proxmox-release-bullseye.gpg
Add the repo to apt sources: echo "deb http://download.proxmox.com/debian/pbs bullseye pbs-no-subscription">/etc/apt/sources.list.d/pbs.list
Download package lists: apt update
Install the software: apt-get install proxmox-backup
You could also install proxmox-backu-server instead of proxmox-backup. The proxmox-backup package contains all recommended extra packages, the other onwe is a minimal setup.
Disable 2FA temporarily
If you can, you should remove 2FA configuration from the root user before migrating or create a new administrative user without 2FA if WebAuthN is used. Else you might not be able to log in anymore.
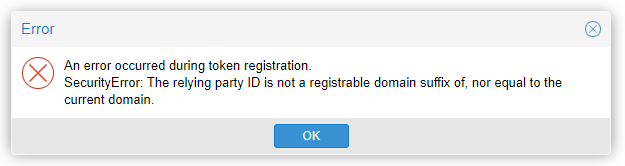
If you are changing the hostname along the migration like I do you are required to deconfigure WebAuthN and reconfigure it after migration as the hostname is the "key" for WebnAuthN accounts on the token.
Stopping services on old and new server
It is important that no backups or other jobs are running while you are migrating. Run these commands on both servers:
service proxmox-backup stop
service proxmox-backup-proxy stop
Make sure that no job or task is running before stopping the services.
Step 3: Migrate config and metadata
Proxmox backup server stores its configuration in /etc/proxmox-backup and metadata (rrd stats etc) in /var/lib/proxmox-backup – We need to sync both folders to the new host (assuming the new host has IP 10.10.20.20) using rsync on the old host:
To make sure all configs are applied and all services are running smoothly, we will now reboot the new server and verify our installation and migration.
After the reboot, visit https://10.10.20.20:8007 (use the IP-Address for now)
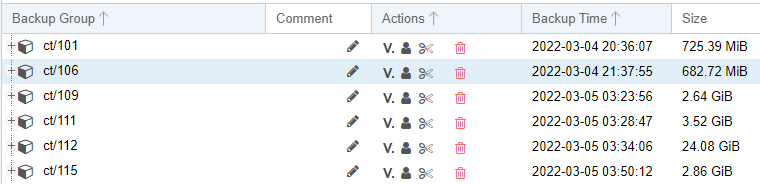
You whould see your datastore on the dashboard now – including historical usage data graph. If so, select the datastore on the left hand menu and select the content ribbon. You should see all backups there. This might look a bit like that:
Great! The worst part is over. If you preserved the hostname, you’re done and can proceed to step 7.
Step 5: Configure SSL
This step does not apply if you keep the hostname while migrating.
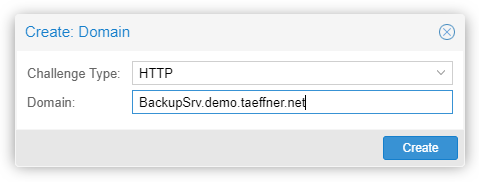
Now you will need to setup Let’s encrypt again (or use your preferred method). You can do this at Configuration -> Certificates. Simply click the add button and enter yor FQDN there:
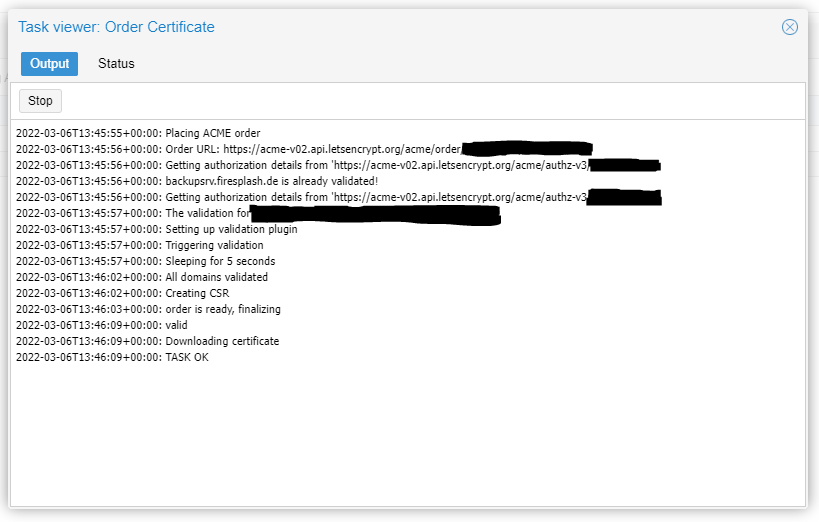
You may also want to remove the migrated old certificate. Then click the “Order certificates now” button. If everything runs smoothly, you should now have a valid SSL-certificate:
Verify this by pointing your browser to https://your-hostname.your-domain.tld:8007/
If the certificate is no used immediately, restart the proxmox-backup-proxy service
Step 6: Configuring the clients
This step does not apply if you keep the hostname while migrating.
Now you have to direct your clients to use the new server. For manual backups using proxmox-backup-client you need to edit the cronjobs or backups scripts. For Proxmox VE you can simply edit /etc/pve/storage.cfg (for example using nano) and change the “server” directive of the storage block:
Proxmox VE will reload the changed file automatically after a few seconds.
Step 7: Testing
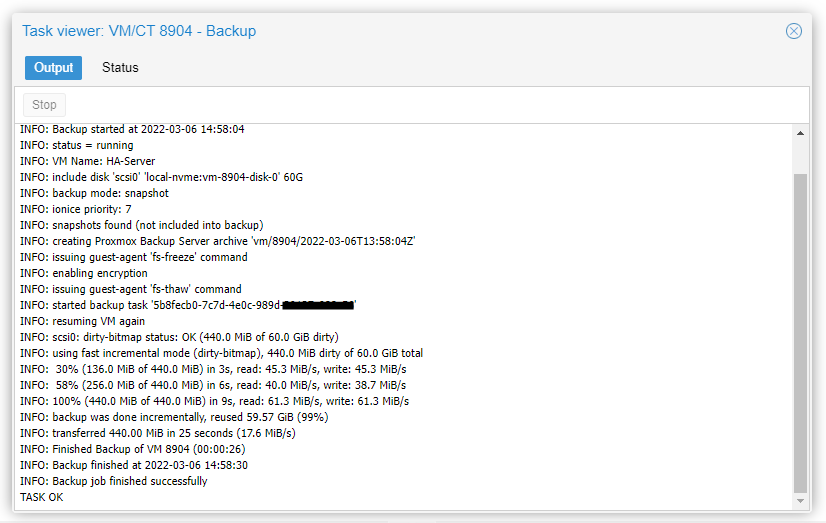
You should try to backup a client to see that everything works. In my case I ran a manual backup from my Proxmox VE server:
While the backup is running, you will also see that in the "Tasks" bade on the top right corner of your PBS server.
Done!
You should monitor your upcoming backups and verfiy them using PBS’ builtin verifications to make sure all chunks are accessible, especially if you also migrated the chunk storage.
Also don’t forget to re-enable 2FA if you disable dit before….
…and if you changed the hostname, you have to reconfigure WebAuthN under Configuration -> Other (and the other is located at the top if you click on Configuration – The did a good job in hiding that!)
I hope you were able to follow my steps to successfully migrate your PBS installation in a rush. Tell me, did you encounter any issues?
Wer mich oder den hauptsächlich von mir bedienten Twitch-Kanal von Firesplash Entertainment kennt, weiß, dass ich gerne hin und wieder für ein paar Stunden Beat Saber in die virtuelle Welt (VR) abtauche. Eine schöne Möglichkeit, vom sonstigen Alltagsstress etwas Abstand zu nehmen. Setzt man die Brille auf, ist die reale Welt erst mal auf pause, fast schon weg. Genutzt habe ich hierfür bislang eine HTC Vive, welche ich Anfang des Jahres günstig gebraucht erstanden hatte. Auch das TPCast Wireless Kit war hier zu meinem Glück mit dabei, denn in eine virtuelle Realität eintauchen ist zumindest für mich schwierig, wenn man von einem Kabel über das man stolpert, dagegen schlägt oder sich darin verheddert immer wieder aus der sonst recht immersiven Erfahrung heraus gerissen wird. Hier möchte ich die alte Vive in den praktischen Vergleich mit der Valve Index bringen.
Die alte Vive und ihre Tücken
Die Vive steht oft in Foren oder auf Reddit wegen der relativ schlechten Bildschärfe – vor allem im Randbereich – also dem relativ kleinen, sogenannten “Sweet Spot” in der Kritik der Spieler. Auch mich hat das gestört, der Grund dafür: Als Streamer will man seinen Chat natürlich im Game verfolgen, glücklicherweise gibt es dafür im VR-Space bei Nutzung von SteamVR schon eine gute Lösung. Beat Saber hat sogar eine eigene Mod dafür. Ärgerlich ist es hingegen, dass man sehr direkt und unnatürlich durch Kopfbewegung auf den Text starren muss (statt einfach kurz nach oben zu schielen). Mal eben im Spielfluss eine Zeile des Chats lesen, ist somit so gut wie unmöglich.
Das, sowie einige Tracking-Probleme und natürlich die Neugierde haben mich dazu bewegt, mir eine Valve Index zu bestellen. Wohl wissend, dass es – zumindest derzeit – keine Möglichkeit gibt, das Kabel dieser Brille los zu werden.
Der Erste Eindruck der Index
Als die Brille kam war der Hype natürlich groß. Gerade frisch aus der Packung genommen und schnell angeschlossen habe ich das neue HMD direkt einmal im Steam VR Home ausprobiert: Genial. Das Bild ist um ein vielfaches klarer und schärfer. Die Brille liegt sehr angenehm am Kopf an und alles funktioniert – obwohl ich noch die Base Stations der Vive verwende (die offiziell kompatibel sind). Das Tracking ist flüssiger und das optische Erlebnis deutlich realistischer als bei der Vive. Definitiv ein großer Pluspunkt! Auch die durch die Fresnel-Linsen verursachten Godrays, von denen man an vielen Stellen im Netz liest, konnte ich im Gegensatz zur Vive nicht ausmachen. (Es gibt übrigens einen Lens-Hack, der die Schärfe und die Godrays der Vive fixen soll.)
Also direkt ab zum ersten Song in Beat Saber… Die Knuckles Controller liegen sehr schön in der Hand, aber mit dem Laserschwert die Blöcke zu treffen gestaltet sich schwierig, denn das Licht schießt in einem anderen Winkel aus der Hand als bei den Vive Controllern. Ich hoffe, ich finde dafür eine Lösung, denn so verrenkt man sich doch recht stark. Na ja, who cares? Die Welt sieht auf einmal so klar aus, es ist als wache man aus einem Dämmerschlaf auf… Der Hype hält an, ich teste Weiter.
Die Realität: Ein anhaltendes Problem
Leider wird das immersive Erlebnis direkt wieder gestört. Als ich bei einem Song Noten über Kopfhöhe zerschlagen muss, verheddere ich mich mit dem Controller im an der Decke mittels spezieller Federschlaufen (nennt man die so?) verlegten Kabel. Ein Risiko, das ich bereit war einzugehen. Und es hat sich bestätigt, denn nicht nur das verheddern ist ein Problem. Ich merke den Zug des Kabels. Während des Spielens bewege ich mich instinktiv ganz langsam immer mehr in Richtung des Fixierpunktes des Kabels, so als ziehe mich jemand vom Schauplatz des Games weg.
Der versierte Kabel-VR-Gamer denkt sich jetzt wahrscheinlich warum ich mich so über ein simples Kabel so sehr aufrege, aber wenn man von Wireless kommt, ist das ein harter Rückschritt. Oder habt ihr etwa noch nie mit eurem Smartphone telefonieren müssen, als es am Ladekabel hing?
Themenwechsel: Fakten.
Kommen wir zurück zu den technischen Fakten: Im Audiobereich verspricht Valve ein realistisches Audioerlebnis. Ich kann das sehr gut nachvollziehen, den die Lautsprecher hängen ein paar Millimeter von den Ohren abgehoben in der Luft. Der Sound ist klar, und scheint tatsächlich aus der Umgebung zu kommen. Einzig im Bassbereich hat diese Technik ihre Nachteile. Der Bass bei Beat Saber klingt etwas dosig. Es fehlt einfach der Druck, den der Deluxe Audio Strap der Vive durch seinen direkten Ohrkontakt besser aufbauen kann.
Steuerung
Die Mitgelieferten Knuckles-Controller (offiziell Valve Index Controller) liegen optimal in der Hand, halten durch ihren Befestigungsriemen sehr gut an den Händen. Mit offener Handfläche schütteln sollte man sie ohne Sicherung jedoch trotzdem nicht. Die Controller fühlen sich sehr wertig an, das Highlight ist natürlich das vollständige Finger tracking. Ich bin gespannt, was die Entwickler daraus machen…
Mein Fazit:
Wer hatte eigentlich die Idee Kabel an VR-Brillen zu bauen? Es stört, nein nervt sogar. Mit einem gut ausgeklügelten Montage-System kann man das aber so weit minimieren, dass die technischen Vorteile der Index (mehr Subpixel, höhere Auflösung, schnellere Wiederholraten, größerer FOV, großer Sweet Spot, angenehmeres Kopfgefühl, stabileres Tracking) einfach überwiegen. Ich werde bei der Valve Index bleiben und hoffe, dass es bald die nötige Technik für ein Wireless-System gibt und dieses dann bezahlbar auf den Markt kommt. Was mich allerdings auch nervt, und mich momentan auch etwas hin und her reißt, vielleicht doch die Vive Pro mal zu testen ist, dass ich in einer dunklen VR-Umgebung Licht am inneren der Brille sehen kann, wenn ich auf etwas helles schaue (wie bspw das Beat Saber Logo beim Ladebildschirm).
Und was denkt ihr?
Habt ihr die Index schon getestet? Was sind eure Erfahrungen? Welche VR-Hardware bevorzugt ihr und was denkt ihr über HMD-Kabel?
Ihr wollt mehr über die Brille wissen? Dieser Beitrag ist kein Review, sondern lediglich ein Erfahrungsbericht. Vielleicht lasse ich mich ja aber noch dazu hinreißen, ein komplettes Review zu verfassen…
Weiteres Fazit nach einem Jahr:
Nach circa einem Jahr habe ich die Index nun zugunsten einer Vive Cosmos verkauft. Der Schritt hatte zwei Gründe: Sie ist Kabellos (mit Wireless Kit) und eine ganze Ecke günstiger. Ich spiele inzwischen seltener VR und für meine Anforderungen reicht eine Cosmos derzeit aus. Die Qualität ist weiterhin sehr gut, wenn auch nicht ganz so klar wie bei der Index. Die Index ist meiner Meinung nach einfach nach wie vor die technisch beste VR-Brille am Consumer-Markt, auch wenn gerade im VR-Segment in den nächsten Jahren sicherlich noch einiges auf uns zu kommt. Sie hat eben aber ihren Preis, und der ist – auch heute noch – stolz.
Bildquelle: Offizielle Valve Website
Blogbeitrag größtenteils übernommen von Cybernaut (Hier schrieb ich früher ab und an)
Wir verwenden Cookies, um unsere Website und unseren Service zu optimieren.
Funktional
Always active
The technical storage or access is strictly necessary for the legitimate purpose of enabling the use of a specific service explicitly requested by the subscriber or user, or for the sole purpose of carrying out the transmission of a communication over an electronic communications network.
Preferences
The technical storage or access is necessary for the legitimate purpose of storing preferences that are not requested by the subscriber or user.
Statistics
The technical storage or access that is used exclusively for statistical purposes.The technical storage or access that is used exclusively for anonymous statistical purposes. Without a subpoena, voluntary compliance on the part of your Internet Service Provider, or additional records from a third party, information stored or retrieved for this purpose alone cannot usually be used to identify you.
Marketing
The technical storage or access is required to create user profiles to send advertising, or to track the user on a website or across several websites for similar marketing purposes.