I am using GitLab Enterprise Edition (Free Tier) for my coding projects. Recently some of my rented servers had raised their prices and I wanted to check what I can probably consolidate to save a few bucks. In this manner I did some research and I noticed that GitLab can be easily run as a docker container.
Previously my GitLab was hosted on a vServer solely used for collaboration (GitLab, Nextcloud, some docker containers along). The reason for this was, that on one hand gitlab is a quite massive compilation of software. On the other hand it also has a quite big footprint regarding ressources.
Since then GitLab has gotten much better regarding resource usage and the move to docker makes it possible to run GitLab on a shared system (as in other services running as well) much easier because there are no compatibility issues between different software configurations on the same system.
Downsides
Docker itself adds a small layer of complexity. You can not simply run gitlab-ctl right on the system, you must add a few configuration options at two different points, … But in the end these are minimalistic luxury issues. Also docker of course adds a little overhead.
That being said, there are no real downsides if you ever used docker before. There is one more thing to remember though: You can not double-use ports.
The positive thing is: You are adding a layer of security. If someone breaks in into your GitLab instance, the rest of the server is still quite secure.
The plan: GitLab behind a reverse proxy
There are multiple ways to run GitLab in a docker container on any docker host. You can give GitLab an own IP and it will behave as a sole server. You can alos give GitLab different ports (not 22, 80, 443) or simply not use those ports on the host otherwise.
In our case I am configuring the container on a server that also hosts other things – including web services. Ports 22, 80 and 443 are already in use. The plan is to give GitLab a different SSH port – which is not an issue, as only I will be using it for commit/pull. The web frontend however must run on the default ports. To achieve this, we will be setting up the already running Apache webserver to reverse-proxy the GitLab Hostnames to the docker container.
This guide will also work without a reverse proxy. You will only ahve to adapt a few configurations.
Preparation: Updating GitLab
This guide assumes, you are already running a server, having the latest docker engine (including docker compose) installed and Apache2 as a webserver including mod_proxy. It will also work with nginx, using adapted configurations. acme.sh will be used to gain a certificate. As always, the commands are based on a debian server. Other distros might be slightly different.
Before starting the migration, we should make sure that we are running the most recent version of GitLab. If not, update it! Source and Destination GitLab must run the exact same version and the newer, the better, because of fixed issues.
Step 1: Configuring the docker container
On your new server, create a folder that holds your docker-compose.yml
mkdir -p /opt/dockerapps/gitlab
cd /opt/dockerapps/gitlab
nano docker-compose.yml # this will open the nano editor to configure the compose file
Next, copy this content into the nano editor and set up the templated fields accordingly. Especially check the version (18.1.1-ee in this example – might be -ce if you’re migrating a Community Edition GitLab and likely a different version).
Also check the ports. They may not be used by anything else. In my case, I am using 9980, 9943 and 9922. GitLab will run under the FQDN git.example.com
Also remember to update the volume bind mount paths. I am a fan of absolute paths, don’t ask me why.
services:
  gitlab:
    image: gitlab/gitlab-ee:18.1.1-ee.0
    container_name: gitlab
    restart: always
    hostname: 'git.example.com'
    environment:
      GITLAB_OMNIBUS_CONFIG: |
        # Add any other gitlab.rb configuration that is required at initialization phase (Hostname, ports, ...) here, each on its own line. the gitlab.rb file will take over after initialization so configure it, too!
        external_url 'https://git.example.com'
        gitlab_rails['gitlab_shell_ssh_port'] = 9922
        nginx['ssl_certificate'] = "/etc/gitlab/ssl/gitlab-ssl.key.crt"
        nginx['ssl_certificate_key'] = "/etc/gitlab/ssl/gitlab-ssl.key.key"
        letsencrypt['enable'] = false
    ports:
      - '127.0.0.1:9980:80'
      - '127.0.0.1:9943:443'
      - '9922:22'
    volumes:
      - '/opt/dockerapps/gitlab/config:/etc/gitlab'
      - '/opt/dockerapps/gitlab/logs:/var/log/gitlab'
      - '/opt/dockerapps/gitlab/data:/var/opt/gitlab'
      - '/opt/dockerapps/gitlab/ssl.pem:/etc/gitlab/ssl/gitlab-ssl.pem:ro'
      - '/opt/dockerapps/gitlab/ssl.key:/etc/gitlab/ssl/gitlab-ssl.key:ro'
    shm_size: '256m'
    healthcheck:
      disable: true
Note: We’re not setting any port at “hostname” or “external_url” as we are using a reverse proxy. If you are chosing the non-proxy custom port approach, add the port in “external_url” like external_url ‘https://git.example.com:9943’.
Save the file using Ctrl+X, confirming the save and spin GitLab up for the first time:
docker compose up
The startup will take a few minutes, depending on your server ressources and power.
When startup is done, let it settle for a few minutes and stop it again by pressing Ctrl+C
You should now see the three folders “config”, “logs” and “data” in your folder:
root@hostname:/opt/dockerapps/gitlab# ls
config  data  docker-compose.yaml  logs
Now, we finally only have to remove the redis cache and secrets files:
This can be partially skipped, if not using a reverse proxy. The tutorial assumes apache2.
For this step, your DNS entries should already point to the new IP. Also you can skip the additional hostnames, if you are not using the features – or add more.
First, we create a dummy folder
mkdir -p /var/www/proxied
This folder should not contain any files so far but it must exist for the configuration to work. Now we will configure apache. Create config file in sites-available:
Copy this content into the file and save it – again adapting hostnames:
<VirtualHost *:80>
    #Adapt the hostname
    ServerName git.example.com

    DocumentRoot "/var/www/proxied"

    Redirect permanent / https://git.example.com/

    <Directory "/var/www/proxied">
        Require all granted
    </Directory>
</VirtualHost>

<VirtualHost *:443>
    #Adapt the hostname
    ServerName git.example.com

    #Adapt the wildcard hostname or add explicit hostnames like registry, ... Remove if unneeded.
    ServerAlias *.git.example.com

    #Create a quite secure SSL configuration. Adapt to your needs or leave as it is.
    SSLEngine on
    SSLProtocol all -SSLv2 -SSLv3 -TLSv1.0 -TLSv1.1
    SSLCipherSuite TLS_AES_256_GCM_SHA384:TLS_CHACHA20_POLY1305_SHA256:TLS_AES_128_GCM_SHA256:EECDH+AESGCM:EDH+AESGCM

    SSLCertificateFile /opt/dockerapps/gitlab/ssl.pem
    SSLCertificateKeyFile /opt/dockerapps/gitlab/ssl.key

    HostnameLookups Off
    UseCanonicalName Off
    ServerSignature Off

    ProxyRequests Off
    ProxyPreserveHost On

    ProxyTimeout 900;

    #We enable SSLProxy but we don't check the certificate on backend
    #because we are using localhost and the public certificate of the real domain.
    SSLProxyEngine On
    SSLProxyCheckPeerCN Off
    SSLProxyCheckPeerName Off

    #Do NOT proxy ACME - We handle this locally
    ProxyPass /.well-known !
    #Proxy anything else - Adapt the port 9943 here to your setup
    ProxyPass / https://127.0.0.1:9943/ timeout=900 Keepalive=On

    DocumentRoot "/var/www/proxied"

    <Directory "/var/www/proxied">
        Require all granted
    </Directory>
</VirtualHost>
We need to create a temporary dummy certificate to allow apache to serve. There are other ways but this is the easiest one to describe here:
You should now be able to browse to https://git.example.com and receive a 502 error page after confirming a certificate warning. Verify this before proceeding!
Next step is requesting a certificate from StartSSL or any other ACME CA using acme.sh – Assuming this tool is already installed and configured on your system, adapt and run this command. Ensure, you’re listing all relevant subdomains. Make sure that all these domains are already pointing to the new server and are configured in apache:
When the certificate has been issued successfully, you can instruct acme.sh to install it into the desired location and automatically reload the services:
You will now get an error at the reload stage because the docker container is not running. This is expected.
Step 3: Backing up and shutting down the old server
Beginning with this step, your old gitlab instance will be down (if not already because of the IP change) and it will take some time – depending on the size of your instance.
Create a snapshot or full backup before proceeding
On the source server, log in to GitLab Admin panel and disable periodic background jobs:
On the left sidebar, at the bottom, select Admin. Then, on the left sidebar, select Monitoring > Background jobs. Under the Sidekiq dashboard, select Cron tab and then Disable All.
Next, wait for Sidekiq jobs to finish: Under the already open Sidekiq dashboard, select Queues and then Live Poll. Wait for Busy and Enqueued to drop to 0. These queues contain work that has been submitted by your users; shutting down before these jobs complete may cause the work to be lost. Make note of the numbers shown in the Sidekiq dashboard for post-migration verification.
You can probably skip these steps, if you are confident that nothing is pending.
Next, save redis cache to disk and shut down most gitlab services by running the following command:
Now you must transfer the redis file, the secrets and the backup to your new server. For example using scp (run these commands on the old server one by one and adapt the hostname). The example is using root to authenticate – which is hopefully wrong in your case. Use your username instead if applicable.
sudo scp /var/opt/gitlab/redis/dump.rdb \
    root@git.example.com:/opt/dockerapps/gitlab/config/dump.rdb

sudo scp /etc/gitlab/gitlab-secrets.json \
    root@git.example.com:/opt/dockerapps/gitlab/config/gitlab-secrets.json

#You might want to explicitly select the specific file to save time, space and bandwidth
sudo scp /var/opt/gitlab/backups/*.tar \
    root@git.example.com:/opt/dockerapps/gitlab/data/backups/
Now, that we have backed up and shut down the old instance and transferred our backups to the new server, we can continue by configuring the new GitLab.
This is probably the most complicated part and you’re widely on your own with it. While copying the old gitlab.rb file (without the modifications above) to the new location could technically work, it’s bes to review the old file and reconfigure the new one cleanly. Remember: How old is your old configuration? Did you always check the upgrade guides regarding gitlab.rb? 🙂
I will only walk through the importand and required configuration. Most importantly make sure, that you are setting any variable that also is in the docker-compose.yml to the same value in gitlab.rb
Open the config file by running nano /opt/dockerapps/gitlab/config/gitlab.rb (or opening the file for example with notepad++ or any other preferred editor)
Then find all lines by searching the variable name, removing the hash-sign at the beginning of the line and then adjust their parameters like the following examples (and your further needs):
If using the container registry also change these:
registry_external_url 'https://registry.git.example.com'

#The following lines are crucial for registry but have to be ADDED to gitlab.rb.
#They are not included by default. Add them below
# registry_nginx['listen_port'] = 5050

registry_nginx['ssl_certificate'] = "/etc/gitlab/ssl/gitlab-ssl.pem"
registry_nginx['ssl_certificate_key'] = "/etc/gitlab/ssl/gitlab-ssl.key"
Step 5: Restoring the backup to the new GitLab instance
Now we can finally spin up the GitLab docker container and import the data back to it. Make sure that the copied files are at their desired locations (gitlab-secrets, redis.rdb and the backup file), then spin up the container on the target server:
cd /opt/dockerapps/gitlab
docker compose up -d
GitLab will now start up in the background. It will take a few minutes even though the process already returns. You can watch the startup by running docker compose logs -f
When GitLab is started up, we can restore the backup by running the following commands one by one:
# Stop the processes that are connected to the database
docker compose exec gitlab gitlab-ctl stop puma
docker compose exec gitlab gitlab-ctl stop sidekiq

# Verify that the processes are all down before continuing - check puma and sidekiq
docker compose exec gitlab gitlab-ctl status

# Start the restore process. Check the correct filename, omitting the ending!
docker compose exec gitlab gitlab-backup restore BACKUP=1751836179_2025_07_06_18.1.1-ee
GitLab will now show a warning before the restore process is started. Confirm it with “yes”. There will be a few warnings you have to confirm during the process, so keep it monitored.
When the restore is done, stop gitlab and start it again in foreground mode. This helps to observe critical errors. It is expected behavior, that there will be warning s and a few errors during this startup. Many of these are actually normal.
docker compose down
docker compose up
After GitLab has started up successfully, check reachability on the web and give it a few minutes to settle.
Afterwards hit Ctrl+C to shut GitLab down again. We have to remove the following two lines from docker-compose.yml:
healthcheck:
  disable: true
Now we can finally start GitLab up and start using it. Remember to change the remotes of your projects, if the SSH-Port has changed.
docker compose up -d
After a few last minutes, GitLab should be up and running.
As a last step, go back to the Admin Panel and re-enable all background jobs.
Time for coffee
…or an energy drink. Was quite some work, right? You should now have sucessfully migrated GitLab from a Bare-Metal installation to a modern docker container.
Did everything work for you? Are you using any features that required additional configuration?
The featured image of this blog post has been genereted by AI
I am operating robot vaccums since the Mi Robot Vaccum came out. Actually I stayed with the Mi Robot Vaccum quite a long time until I decided to upgrade to a Roborock S7 Pro Ultra (white). I bought it right at its release and I was very satisfied with the cleaning it was doing.
Lately I read about the S8’s new feature: It can dynamically extend it’s side brush to better reach edges and corners. Some research later I noticed the Qrevo Master which has two rotating mops instead of one vibrating mopping pad. I think on a tile floor the rotating mops could probably do a better job.
When I finally read that the Qrevo Master can even extend one of it’s mops I decided to buy one. So now, let’s see if it was worth it…
First impression of the Qrevo Master
I am not an unboxer so we will skip the images but I can say as always Roborock did a very good jop packaging the device. It comes in a cardboard box with tons of packaging material. So it should be super safe even if it gets dropped from the delivery car.
Then attaching all the parts together I notiec the dock is quite a bit less wide but higher than the S7 Ultra dock. Also the dust bag has moved from the top to the “middle floor” and is about twice as big. The tanks for fresh and grey water seem to be a bit bigger, too. (This is not a tech comparison advert review but an experience report so forgive me, I did not check the technical details)
The dock now also features a hot air mop dryer as well as hot water washing just as the S8 one does, too.
Most important features for me
As I already said, for me the “killer features” were the ability to extend the side arm(s). I was hoping to get the area at the kitchen base cleaned (which the S7 failed on). It is always these last few – about 10 – centimeters below the drawers. They are exactly 1mm higher than the robot itself so the robot does not drive below them.
Also another feature I wanted was the reactive AI as I always had issues with the S7 getting stuck on the base of my bar stools and the feet of the clothes horse which is only a horizonal 15mm pipe.
First try
So after unboxing and assembly (whch took me just about 10 minutes) I placed the dock where the S7 dock was before. I removed everything that was laying around to give the bot a fair chance for its first journey.
That said, I should probably also say that I did not clean up the floor for a few days at all for the robot to have a challenge.
I allowed the bot to map my ground floor and then I started a first cleaning eith its default settings. The cleaning took about as long as with the S7 but the bot is a lot more silent. I observed parts of it’s work and took some pictures to describe the issues I am seeing (next section).
After the Qrevo master finished its first cleanup, I reviewed the results and I unfortunately have to say: It does not look more clean than with the S7.
Problems observed with Qrevo Master
#1 Doors
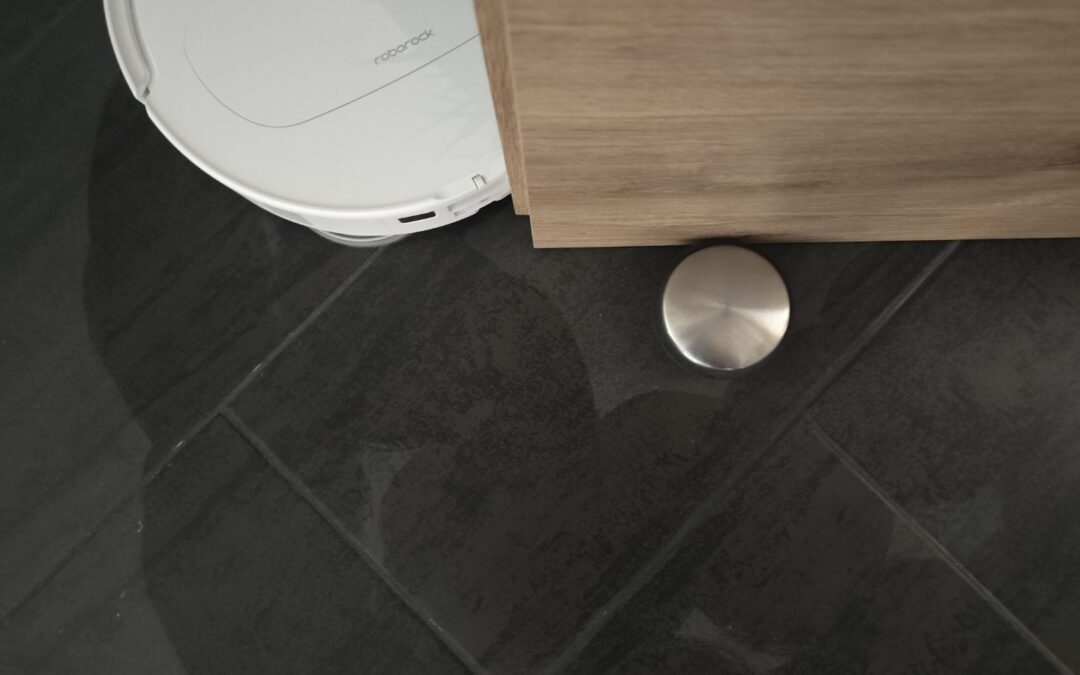
The first thing I noticed, was that while the robot has its extendable arm, it handles it wrong. What I mean is, that it does unextend the arm when driving abround a “sharp angle” and extend it again too late. This causes a “blind sport” as you can see in the picture below.
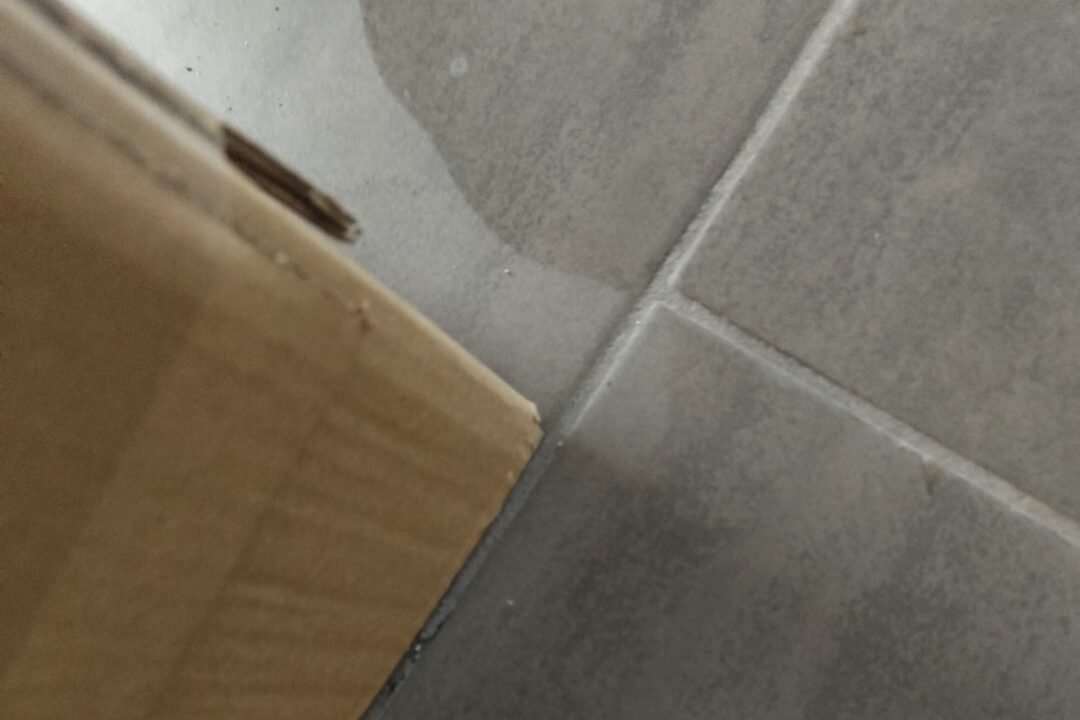
#2 Outside Corners
I put a box on the ground. Same issue as with the door so it does not matter if its a door or an actual 90 degree corner.
#3 Door stopper
Whoops… This one is even worse! Guess it’s the same issue in the navigation logic
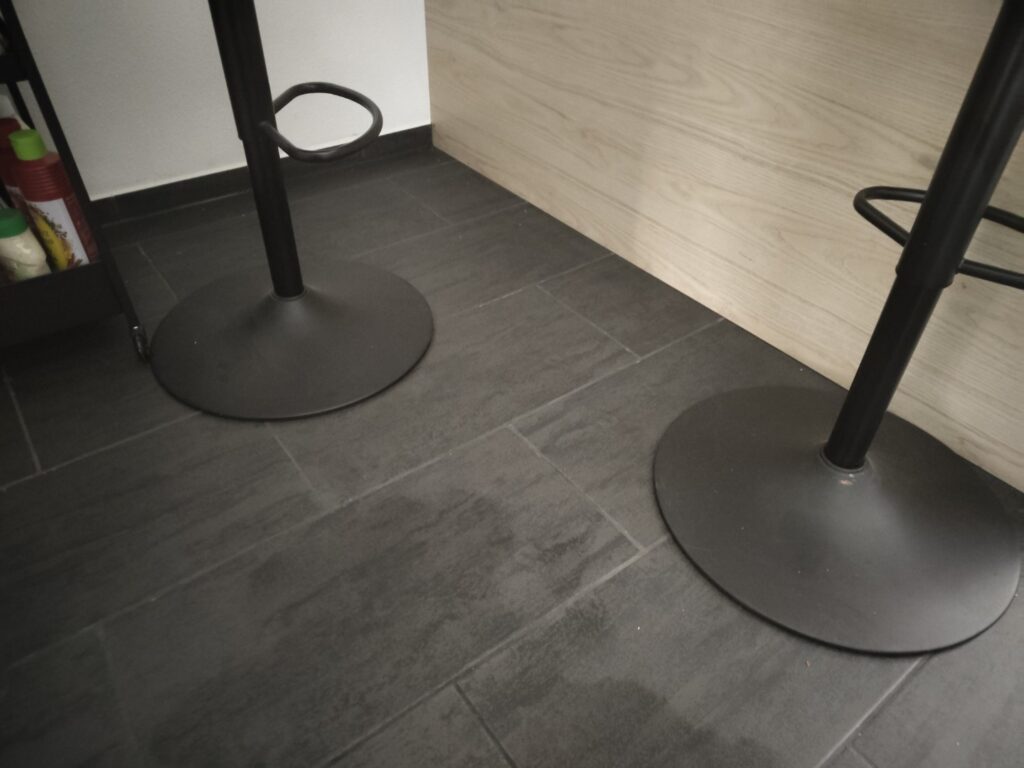
#4 Bar stools
This one is bad. The reactive AI feature detected my bar stools as posts and decided to omit them. While this is a wise choice, as my S7 always got stuck as it tried to climb the bases, I don’t understand why it does not drive through the corridor between them. There is plenty of space for the bot to pass through
#5 Kitchen dirt
This was left over by the bot (after I left it over for him actually). It did not detect this and did not try to clean it again. A manual second cleanup with higher suction power solved this.
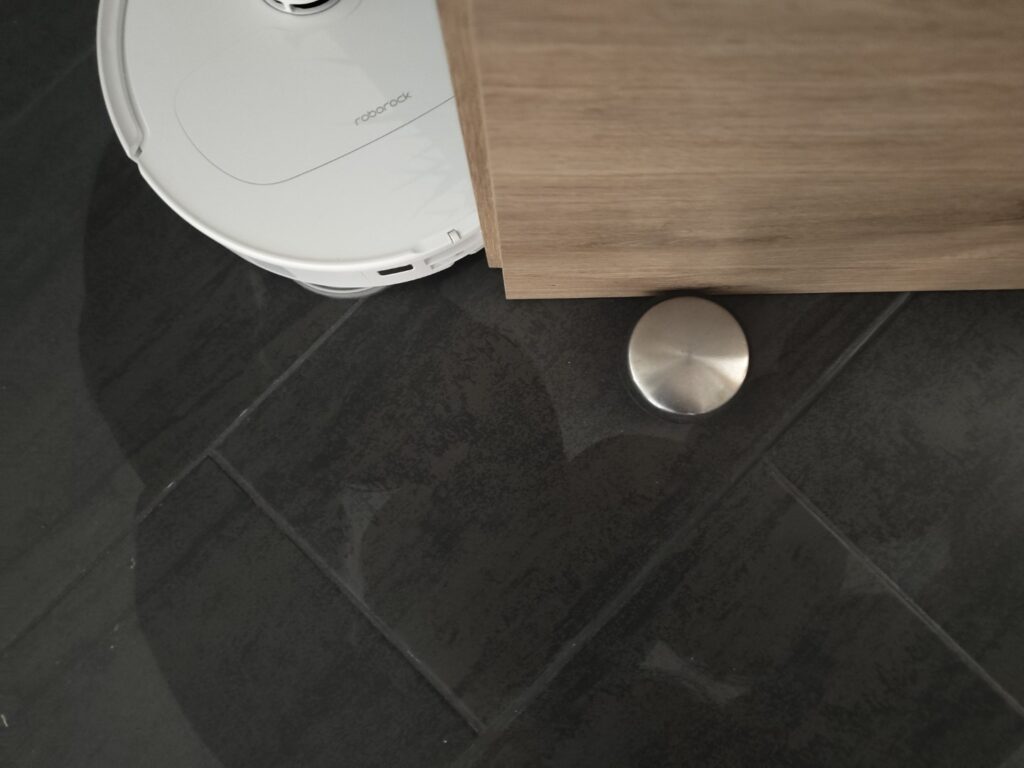
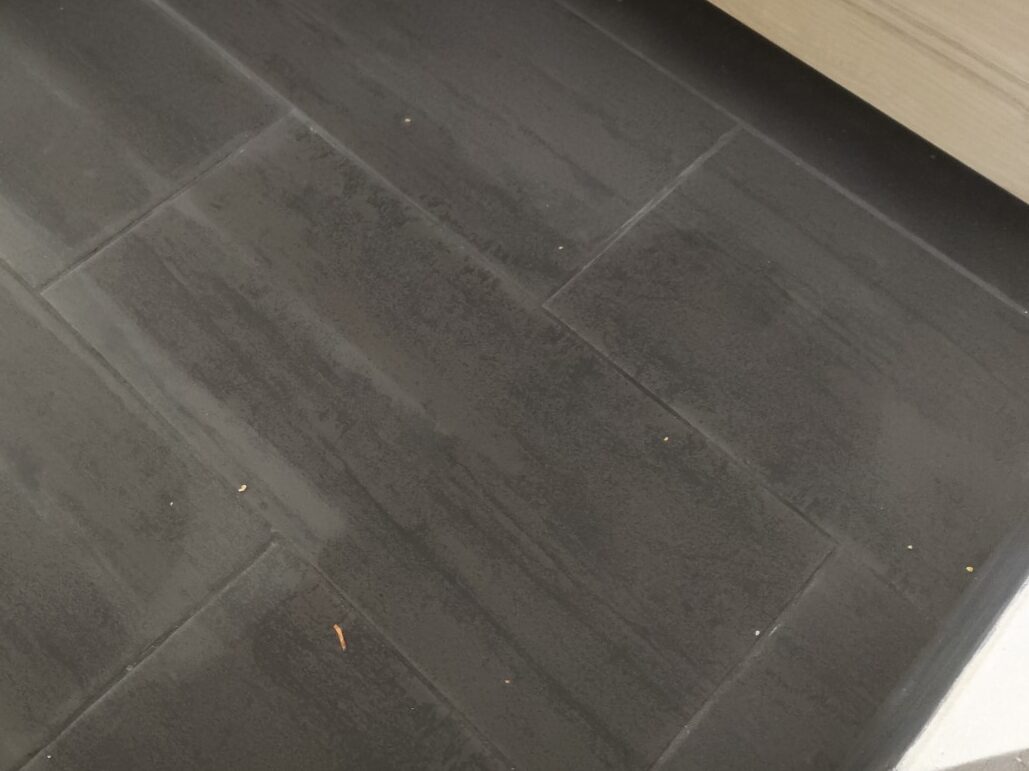
#6 Kitchen base
Uh oh! The Qrevo master does sweep dirt under the table. Well not actually the table, but the kitchen base. The picture might make it look as if the space is very deep but the dirt actually is laying just about two centimeters beneath the front edge.
How the Qrevo Master performed
In the end I have to say all these issues are not worse than the S7 pro ultra performed for me. But it is not what I expected from the Qrevo master.
Why? The extendable arm does not reach its full potential in its current state. I think a firmware update can solve this but roborock will have to invest more into the navigation code to make this valuable in my eyes.
The Bar stool thing is probably a result of the camera viewport and could also be improved by software. Unfortunately I only have the option to totally ignore this.
The Kitche Base issue is the thing that really annoys me. I was hoping that an extendable side brush as well as an extendable mop would make this much better. But it does not. The result is actually exactly the same as with my S7 pro ultra here.
The only thing that is noticably better is the room edges or edges around furniture (except the corners) as well as the cleaning under the hanging toilet. The S7 always left a small spot which the qrevo “master”s perfectly well.
Worth it?
If I would sell my S7 pro ultra combo I’d probably have a chance of getting it sold for about 400-550€. The Qrevo master costs 1099€ at the moment so the invest is about 600€.
Actually I am not sure if the upgrades are actually worth the 600€ they cost. If the arm would perform better and the AI would do a better job on the bar stools I’d say yes. Unfortunately there will probably be no way to get the robot driving a few centimeters unter the kitchen base. The LIDAR is higher than the edge. To clean up the floor completely it would need to allow the bot’s main shell to go beneath tha. I guess I won’t get this with any new model right now.
A positive finding I have to share is, that it did not get stuck anywhere at all. Except the main brush when it tried to eat a clothespin. (AI? Where have you been? 🙂 ) Also the carpet cleaning works noticably better than with the S7 Pro. The stronger suction power of 10.000 pa ist a great upgrade.
I will be writing to roborock, showing them this article to see what they say about my observations. Maybe this helps in deciding if I will keep the Qrevo master in the end.
Links in this article are affiliate links. By buying stuff from amazon using these links, I will get a share from amazon. This way you are supporting my doing without any extra a cost.
Lately I got my hands on a cool new project, utilizing a Cisco PrecisionHD TTC8-02 Telepresence camera (More to come…). In this blog post I want to comapre two different methods to capture this camera, using a HDMI grabber, in 1080p30 (1920×1080 pixels with 30 FPS), using a Raspberry Pi 4B (2GB in my case).
Preparation
Before starting, I installed Pi OS (Bullseye) on my device. I did all the following tests, using a WIFI-Connection on the Pi and OBS (media source) as a client. As the builting WiFi was not feasible enough in my case, I added an external WiFi-Stick. This post will not cover installing OBS, a Wifi Driver or Pi OS etc.
To use the hardware acceleration for encoding, we have to add this line to /boot/config.txt:
dtoverlay=vc4-fkms-v3d
Why external WiFi?
Originally I wanted to use Dicaffeine to NDI-Stream the HDMI source using a cheap USB HDMI Grabber (Ref-Link) from Amazon.
I did not manage, to receive the vido on my PC. I always saw the source, but never received a frame. Even with a custom-compiled FFmpeg I got no success using NDI at all. Not even a 720p5 test video. On Ethernet, all worked fine.
This lead me to further diagnostics… In my environment, WiFi is a nighmare. Long story short, I did some download tests:
Connection
Measured speed
Builtin WiFi 2,4GHz
300 kB/s
Builtin WiFi 5GHz
0.5 – 1 MB/s
External ancient WiFi “g-Standard” dongle (2.4 GHz)
3 MB/s
New external WiFi Dongle with external antenna
160 MB/s
I think the results and my reasons to use an external adapter are quite clear. In my case, the driver had to be compiled manually and required setting arm_64bit=0 in config.txt. I am pretty sure it will also work with internal WiFi in cleaner air 😉
Test environment
I created a busy scene on my desk. Then I positioned the camera and did wire it directly with the USB grabber, which is connected to the Pi’s USB2 interface (The stick is only using USB2).
For the CSI module tests, I got my hands on this CSI-2 connected HDMI-grabber. For these tests, I removed the cable from the USB-Grabber and connected it to the CSI-Grabber.
All hardware configurations have been made before the tests, so the environment is identical on all tests. Both grabbers were always connected but the other inactive at the time of testing.
The Pi sits in a case (ref link) that is cooled by a small “Pi Fan”.
I installed gstreamer from the official repo using th following command. Please not, it installs quite everything…
Installing the USB-Grabber is easy. Connect it -> works. It does not require any configuration or setup.
The CSI-Grabber is a bit more complicated:
First of all, update your system (apt update && apt -y full-upgrade), then enable the overlay by putting this line into /boot/config.txt:
dtoverlay=tc358743
This can be a second line, right below the previously added line.
Then we need to edit /boot/cmdline.txt and add cma=96M to the beginning, The whole line will start like this:
cma=96M console=tty1 root=PARTUUID=...
After a reboot, the device should be up and running.
Warning: In the following commands, I am always using /dev/video0 for the CSI and /dev/video1 for the USB-Grabber. Adapt the commands to your setup. If you only have one, it is likely /dev/video0
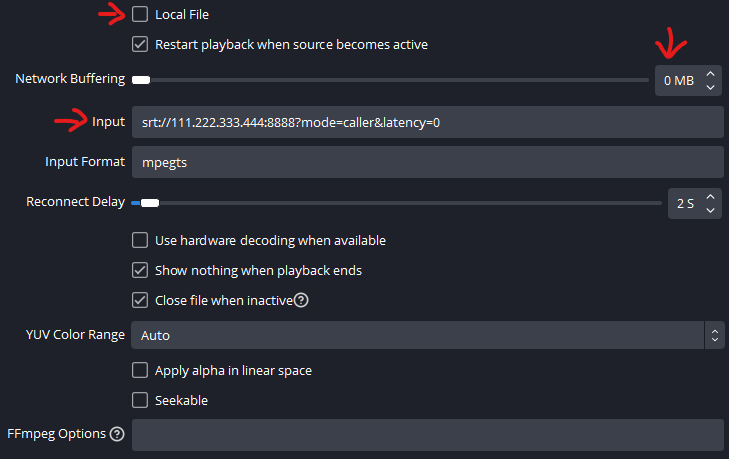
Setting up OBS
You can use any receiver software of course, but I an using OBS as this camera will be used for streaming later on. The media source must be set up like this (use your Pi’s IP address instead of 111.222.333.444):
The important settings are marked with red arrows. Actually, I did not notice any difference without latency=0 but I read somewhere, this was an option to reduce buffering.
Running an SRT-Stream using the USB-Grabber
Now that OBS is set up, we can start the stream (or we could do this before OBS is up). The following command works pretty well for the USB-Grabber:
Using this command, the delay (cam to OBS) is about 1 second in my environment. The color quality is good and the framerate is consistent after a few minutes runtime.
This command lowers the delay to about 0.8 seconds by using the basline profile but the color quality is much worse (see the comparison below). CPU-Usage and framerate are widely identical:
Then I did the same expriment, using the CSI module (ref link) C790 from Geekvideo. Here we need some more setup before we are able to stream. Unfortunately this need to be done after each reboot, else GStreamer will not start. Again: this is not a tutorial but a technical experiment and report, so maybe I will come up with a solution later.
Step 1: Create an EDID file
Create a file, called edid.txt, containing the following – copy exactly!
This file controls the capabilities, the adapter advertises on HDMI to the source device. This specific variant locks it to 1920x1080p30. The file can of course be re-used for later reboots.
Step 2: Apply EDID-Info and configure Video4Linux driver
First, apply the EDID-File to the device using
v4l2-ctl --set-edid=file=edid.txt -d /dev/video0
Next, we configure Video4Linux to the correct timings:
This variant caused slightly higher system load than the “bad color” USB variant, causing a lower delay of only 0.4 – 0.6 seconds
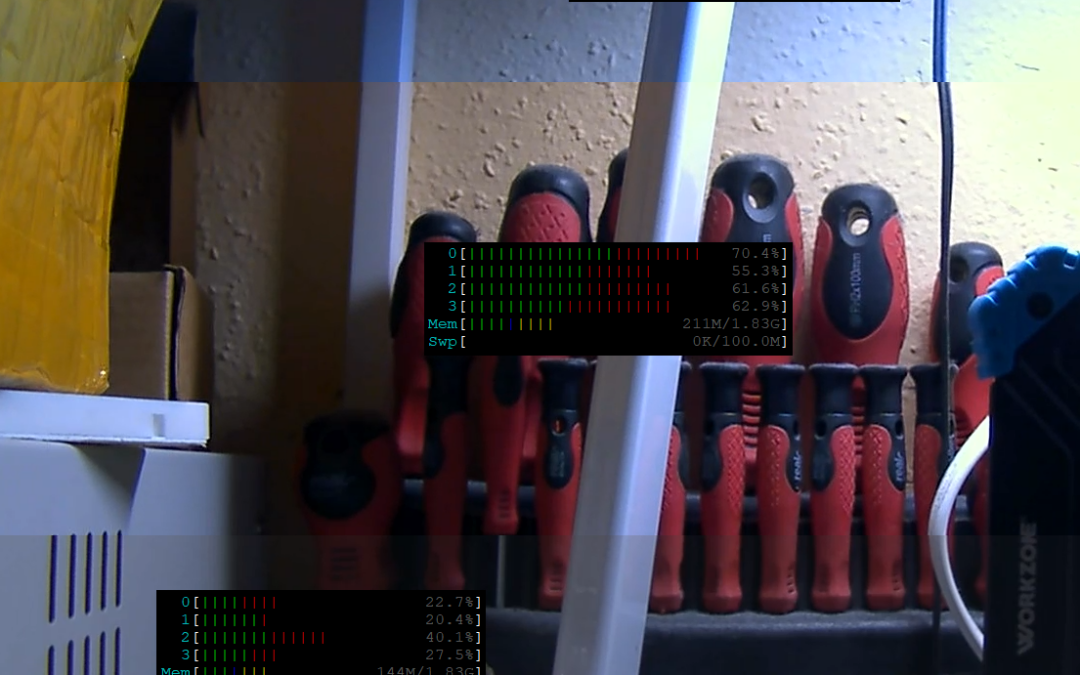
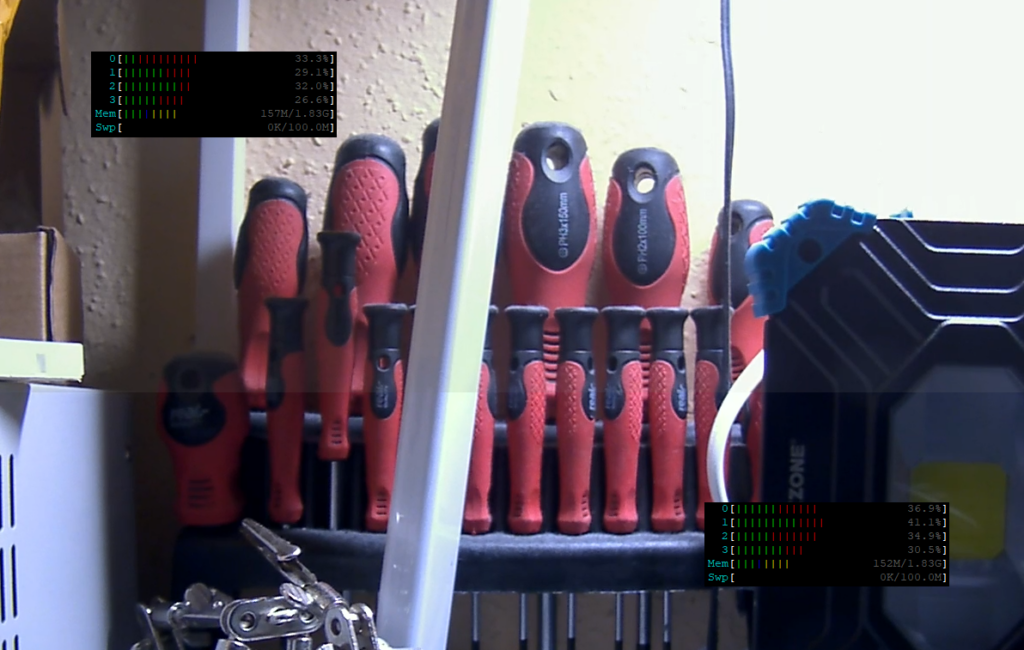
Image comparison
I created a side by side comparison image using the two grabbers. From top to bottom:
USB with baseline profile / USB with main profile / CSI with main profile
Regarding load: A second try caused much lower CPU-Usage on Test 2, so maybe the CPU-Usage is not accurate.
As you can see, the USB-Main variant has the best image quality, directly followed by the CSI-Variant. I think this could possibly be tuned further but as we’re using the same encoding settings, I fear that it comes largely from the chip. Regarding load, the CSI-Approach is the clear winner when relating quality with load.
The next day… RGB!
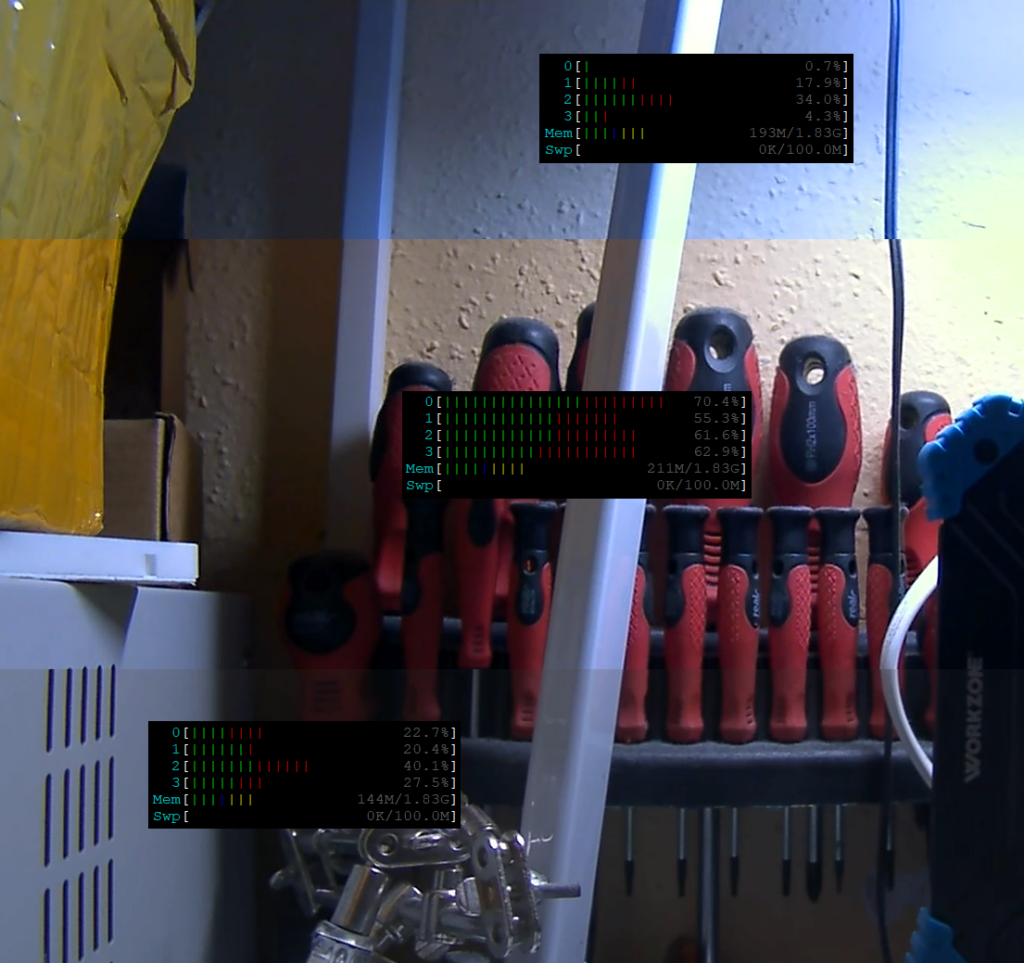
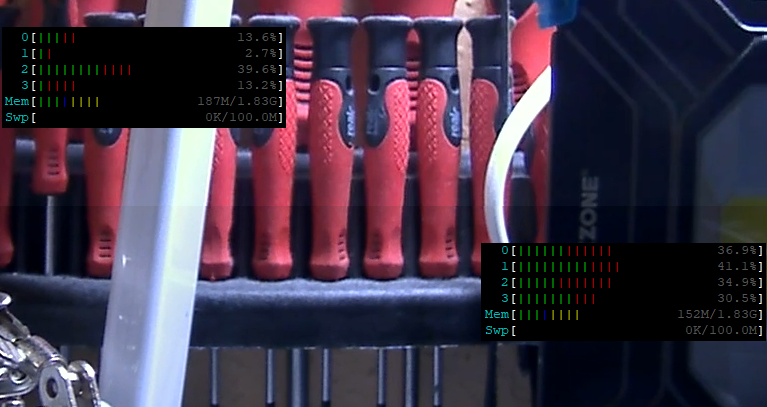
A day later, I remebered that I read somewhere, this CSI-Thing would be capable of UYVY as well as RGB. So I gave this another shot. Here is the commandline:
And this is the result comparison. Delay is identical to the UYVY variant, system load is slightly higher. I think the colors are a little better (bottom is RGB, top is UYVY)…
…but compared to the USB-Grabber, the result is still worse – USB top, CSI bottom:
I also got knowledge about a new chip (Thank’s to pr3sk from JvPeek’s Discord), built into newer USB 3 grabbers. I just ordered one of these and will report in a seperate post, if those are maye “the solution” to everything 🙂
Interestingly, the CPU-Usage while grabbing from USB was much lower this time.. I got no idea why… Maybe the load comparison from yesterday was garbage…
End-Results
I can say that both approaches seem to work. It looks like the USB-Variant is a bit less stable (in a few tries, the stream freezed after a few seconds).
After all, I am not really sure how to proceed. The CSI-Variant is much more performant and never had an outage while testing. Regarding image quality the USB-Variant (with main profile) is clearly better.
I am not a gstreamer pro, so maybe someone has ideas on how to improve these pipelines? Feel free to comment!
Updates
August, 22: Added source declaration and further explaination to EDID-File
[German Article] Ich bin seit vielen Jahren zufriedener “Logitech-Kunde” und bin entsetzt, wie sich die Qualität der Produkte geändert hat. Wenn du wissen willst, was mir da “über die Leber gelaufen ist”, bist du hier richtig!
Eine Sache vorweg: Dies ist ein Erfahrungsbericht. Viele Dinge sind persönliche Vorliebe und meine Einstellung beziehungsweise Erwartungshaltung zu einem Gerät für das ich einen gewissen Preis zahle. Jeder mag gewisse Dinge anders sehen und das ist auch völlig richtig so.
For my english readers: Sorry. Sometimes I feel like writing things down and don’t want to translate everything on my own – like in this case. This article is a testimonial about my experience with current logitech hardware.
Es war einmal, vor langer langer Zeit… Bereits in meiner “Kindheit” hatte ich mit der G11, später dann der G15 Tastatur meine erste Logitech G-Series Tastatur. Die G15 besaß ich bis vor ca 4-5 Jahren noch. Zu diesem Zeitpunkt bin ich dann endlich mal – wegen der Abnutzung der G15 – wieder etwas moderner geworden und auf die G910 umgestiegen. Ich weiß nicht mehr, ob es Artemis oder Orion war.
Vor etwa einem halben Jahr ist mir etwas in die Tastatur getropft, und ich musste die Entf-Tastenkappe ausbauen. Dabei ist mir ein Stück von der Kappe abgebrochen (die Halterung) und diese hielt eben nicht mehr. Beim Versuch, die Cap festzukleben, wurde leider der Schalter in Mitleidenschaft gezogen und ich habe mich dann kurzerhand entschieden, die ganze Tastatur zu ersetzen. Ich habe noch nie etwas so bereut, wie meine G910 entsorgt zu haben. Du fragst warum?
Die “neue” Logitech G910
Das ist einfach: Ich habe mir eine neue G910 bestellt und angeschlossen. Sie lief und ich war happy. Die alte 910 habe ich – weil sie ja defekt war – entsorgt. Einige Tage später merkte ich, dass ich mich erstaunlich oft vertippe. “rr” oder “tt” kam häufig vor, genau wie das Fehlen derselben Buchstaben in Worten. Also habe ich einen Test gemacht:
Notepad auf und immer abwechselnd “R” und “Enter” angeschlagen. So sah das dann aus:
r
r
rr
r
r
r
r

r
rr
r
rr
r
Was zeigt uns das? Die R-Taste schlägt manchmal doppelt an und manchmal sogar gar nicht. Übrigens ist die Darstellung nicht übertrieben. Es war wirklich so häufig!
Defekt… Kann passieren!
Ich dachte mir, auch eine Logitech-Tastatur kann mal ein Montagsmodell sein. Ich kontaktierte den Onlineshop, in dem ich die Tastatur gekauft hatte und durfte die Tastatur zurückgeben. Zugegeben: Es war ein “gebraucht” Modell, da kann man jetzt drüber denken, was man will.
Ich erspare euch die Details: Ich habe diese Aktion mehrfach durchgeführt. Am Ende habe ich immer zwei bestellt, getestet, und wieder zurückgeschickt, bis ich eine hatte, die vermeintlich okay war. Vermeintlich!
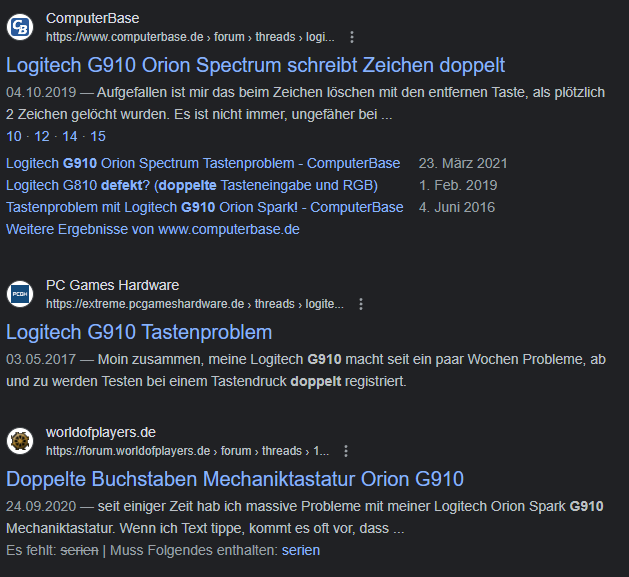
Ihr könnt euch sicher denken, dass auch die letzten Endes “funktionierende” Tastatur nach einigen Wochen Anschlagsprobleme bekommen hat. Eine Suche bei Google bestätigt meinen Verdacht…
Ich bin nicht der einzige mit diesem Problem. Wühlt man sich durch die Foren, stellt man fest, dass das sehr häufig vorkommt. Manche haben Lösungen gefunden, wie die Tasten mit Alkohol zu spülen etc. Bei einer neuen Tastatur werde ich das aber sicher nicht machen. Ich brauche eine Tastatur, die Funktioniert und keine wartungsintensive Bastelbude.
Mein Fazit: Den Mist können sie behalten. Ich schickte die Logitech G910 also zurück und bestellt ein anderes Modell. Ich versuchte mich u.a. an der Logitech G213 Prodigy, die eine Rubberdome-Tastatur ist (keine Mech-Schalter, die kaputt gehen können): Witzig. Welcher Ingenieur dachte sich da wohl “Wir verbauen mal eine Spule, die fiept, wenn man die RGB-Beleuchtung der Tastatur auf halber Helligkeit einschaltet”? Die 10 Cent die da gespart wurden, waren es sicher wert… Übrigens findet sich das auch in den Produktbewertungen auf Amazon wieder.
Was ich selbst bei dem Modell nicht erlebt habe, aber in den Bewertungen tatsächlich auch öfter vorkommt: Einzelne Tasten schlagen nicht an… Scheint sich hier dann aber standesgemäß gleich auf ganze Regionen der Tasten zu belaufen. Also mutmaßlich Platinenfehler.
Wird die Logitech G815 meine neue Tastatur?
Ihr könnt’s euch denken (das kommt in diesem Bericht öfter mal vor): Die Logitech G213 ging natürlich zurück. Ich bestellte eine G815 – das neue Flaggschiff. Aber eben mit Kabel. Eine beeindruckende Tastatur! Ist vom Design mal was anderes als die ganzen Gaming-Spritzguss-Plastikteile. Fühlt sich hochwertig an und ist erstaunlich schwer.
Es ist eine Tastatur mit mechanischen Schaltern, aber nicht die Romer G Switches (welche die G910 hat), die für ihre Ausfälle bekannt sind. Super! Mit der Tatstatur lässt sich sehr angenehm tippen. Wären da nicht einzelne Tasten, die doppelt anschlagen… Und täglich grüßt das Murmeltier… Händler kontaktiert und ich bekomme Ersatz.
Die Ersatzlieferung folgt sogleich und ich nehme sie in Betrieb: Die “+”-Taste auf dem Numpad schlägt nur ganz selten mal an, wenn man nicht mit Gewalt drauf hämmert.
Ich geb’ dem Ganzen jetzt noch eine Chance, sonst wechsle ich den Tastentyp auf linear. Die scheinen das Problem nicht zu haben. (Ich habe eine G815 mit linearen Switches anderenorts im Einsatz, die stand hier auch eine Weile und wurde dann wegen des für mich angenehmeren Tastenanschlags durch die Taktile abgelöst)
Wie siehts mit der Maus aus?
Ich habe eingangs erwähnt, dass ich stolzer Nutzer einer G700s bin. Nach knapp 10 Jahren Nutzung (Kein Scherz! Gekauft 11/2013) funktioniert sie noch immer tadellos und ich will sie eigentlich nicht ersetzen, aber das Scrollrad löst sich langsam auf und mir stecken immer wieder kleine Splitter vom Lack des Scrollrads im Finger… Das ist glaube ich nicht ganz optimal so rein gesundheitlich.
Ich informiere mich also über aktuelle Modelle… G903 und G502 sehen vielversprechend aus. Die G903 wäre mein Favorit, aber das sagen die Bewertungen? Man glaubt es kaum… (Es folgen Auszüge aus den Bewertungen bei Amazon – Affiliate Link)
"For anyone looking to buy this mouse DO NOT BUY IT.
Like everyone else, after a few months of use my right click started to develop a double clicking issue, or just the right click never consistently detected it as clicked down."
"Super Ding außer dass die rechte Maustaste bisschen Faxxen macht"
"Linksklickfehler nach 4 Monaten Betrieb"
"Nach knapp einem Jahr wurde auch ich Opfer des Doppelklick-Fehlers,"
Darauf habe ich nun wirklich keine Lust… Also habe ich mit die G502 SE bestellt. Sieht cool aus, hat zwei Seitentasten, erlaubt das Scrollrad zu entkoppeln (nutze ich manchmal gerne beim browsen) und was ich persönlich sehr praktisch finde: Man kann mit einer Schultertaste einen Präzisionsmodus aktivieren. Das ist nicht nur beim Gaming genial… Man kann sowas durchaus auch beim arbeiten mit Unity gut nutzen.
Klingt gut (eigentlich nicht), aber naja…
Okay, die G502 ist in allen Varianten jeweils in ihrem Feld ein Mittelpreisiges Modell. Vielleicht bin ich zu anspruchsvoll, aber die Maus fühlt sich im Vergleich billig an… Die Haptik ist wie bei der Mäusen, die mit Office-PCs meist kostenlos mitgeliefert werden. Das geht gerade noch, aber das große Problem ist: Das Scrollrad… Das passt weder von der Optik, noch von der Haptik zum Rest der Maus. Auf den Bildern sieht sie toll aus, aber in echt könnte sie ein Rad von einem Kinderspielzeug-Bagger oder so sein. Da hätte ich mir lieber 5€ Aufpreis und dafür n ordentliches Scrollrad gewünscht. Etwas kleiner als die G700s ist die Maus auch, geht für mich aber gerade so.
Interessant ist auch das Klick-Geräusch. Die G700s hat ein sauberes “Klicken”. Kurz, knackig, hohe Tonlage. Die G502 SE hat einen tieferen Ton mit einem leichten Nachhall. Das sind alles zusammen so die Kleinigkeiten, die eine 100€-Maus eben 100€ Wert machen. Liebe zum Details und hohe Qualität bis zum Schluss. Die G502 SE ist zum Glück keine 100€-Maus.
Ich teste die Maus jetzt noch 1-2 Tage und überlege mir, bei meiner G700s das Scrollrad zu tauschen. Vielleicht macht sie ja nochmal 10 Jahre mit mir…
Fazit
Leider hat es kein anderer Hersteller geschafft, mich zu überzeugen. Roccat zum Beispiel macht auch schöne Tastaturen, aber warum muss mir die LED unter der Taste direkt ins Gesicht leuchten? Hätten 5mm “Mantel” um die Tasten um das zu verhindern geschadet? Ich habe mir in Läden und auch die ein oder andere hier vor Ort angesehen und ausprobiert und muss sagen… Entweder ist die Haptik richtig schlecht oder die Tasten zu klein, oft wird auch die linke Windows-Taste durch Fn ersetzt (das nervt mich tierisch)… Manche Modelle haben einen Druckpunkt, dass man denkt, man drückt ne Taste von einem Schaltschrank…
Aber so ne richtig gute Tastatur mit Hintergrundbeleuchtung hab ich nicht gefunden. Ja ich bin wählerisch, aber bei Kosten von oft deutlich über 100€ für eine Tastatur darf ich das wohl auch sein.
Mir brennt eine Frage unter den Nägeln: Was ist nur aus Logitech geworden? Ist das der neue Standard? Ich war früher begeistert aber was ich mit den aktuellen Modellen gesehen habe… Es macht mich traurig.
Welche Tastatur und Maus nutzt du und hast du ähnliche Erfahrungen gemacht? Ab in die Kommentare!
Using a webcam on a virtual desktop environment can be easy. Or it can be tricky! Read on to learn about highs and lows and what a VirtualCam has to do with it…
Where I work, we get confronted with lots of users who got their own ideas and requirements. Usually in IT, one would enforce a concept or a policy but this is not always the best solution.
For example in this case, we gave some users a mobile device (Laptop) installed with IGEL OS 11 as a thin client. The requirement that has just reached me, was to be able to use a webcam in a browser based video conferencing app. Sounds simple, huh?
The main problem without VirtualCam User Settings
On a thin client, users are usually connected to a virtual desktop environment – In our case Citrix Virtual Apps and Desktops. You do usually also not want to spend too much bandwidth on transferring video data. This is especially true for mobile clients which might access the system from external locations through an ADC (NetScaler) where you license bandwith.
The solution to this any many more issues (Buzzword: GPU requirement) is offloading.
Optimized Apps using Citrix Virtual Channel
The most common video conferencing providers like Cisco (WebEx) and Microsoft (Teams) have elaborated ways to split using their apps in a server- and a client component. This is very cool but unfortunately in our case the application was different. It’s a HTML5 app.
Browser Content Redirection
The second idea was to use Citrix Browser Content Redirection (BCR) to offload the whole webpage to the client OS. Long story short: The Application was unable to even start. The scripts were too complex to be redirected. We failed with about a thousand javascript errors.
The final solution: Citrix HDX Camera
The “fallback” is redirecting the video. Fortunately our Terminal Servers have decent GPU cards installed which allows us to process video very efficiently. Because of this, we “only” needed to enable HDX Camera Redirection. After some struggles in the first place (which were citrix policy issues) we managed to redirect the camera using this basic citrix feature quite well and it works as expected.
So far, so good…
Here comes: The User!
So initially I told, that we got some special requirements… There you go: It didn’t take long until someone figured out that their cam was actually not working as expected.
What happened?
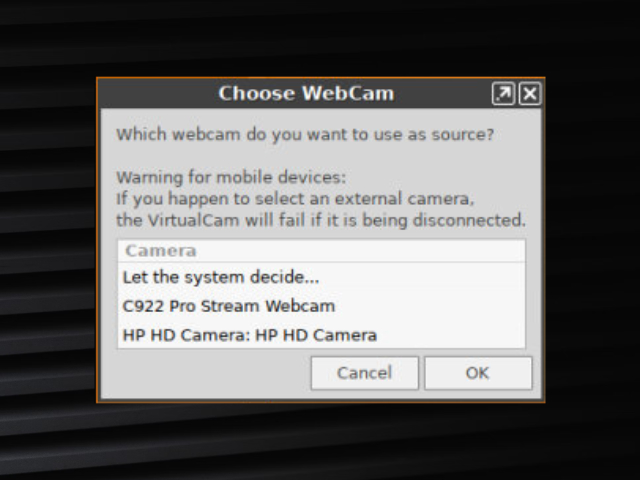
During the pandemic we were forced to buy several different webcams as availability was a problem. So now we got about 5 to 10 different camera models plus integrated cameras in some devices. In the end a user might even have two or more cameras available, but HDX only redirects the “primary” camera (as in the first one enumerated). And this was always the integrated laptop camera for us.
How we solved it using VirtualCam
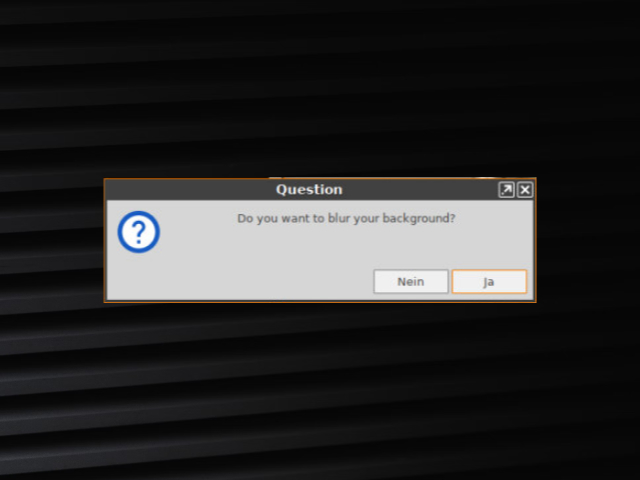
IGEL luckily just introduced the “Virtual Camera Background” feature in IGEL OS 11.08. This not only allows to blur the background for any application. It additionally provides a registry setting to set the camera source to a specific camera (by name, number or VID/PID). Then it replaces the main camera by the virtual one. This VirtualCam is then redirected by Citrix HDX.
This was the basic solution but we would need to configure the camera for every single client using the registry. While possible, that’s an annyoing sysadmin task. Additionally, a mobile user are changing workplaces from time to time. They are then often forced to use a different cam (like integrated on mobile, monitor cam at their desk).
Power to the user – Let them control VirtualCam settings!
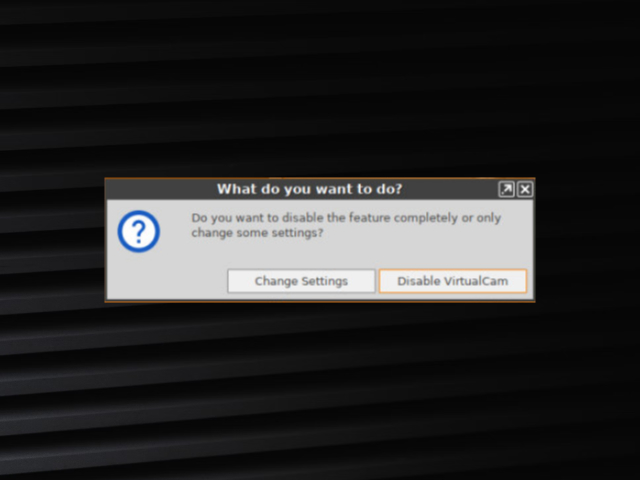
I created a script that can be deployed to an IGEL Thin Client and linked as a custom application to allow the user to toggle and configure the VirtualCam feature.
All you need, is a basic profile to configure the Custom App and the basic VirtualCam parameters. The shell script I wrote contains the required logic.
The profile creates a new Folder on the desktop called “Settings” and puts a link in it, called “VirtualCam”. You might want to change that under desktop integration.
Work Done!
Are you using uncommon video conferencing tools, too? If yes, which and did you already encounter such a situation yet? How did you solve it?
Wir verwenden Cookies, um unsere Website und unseren Service zu optimieren.
Funktional
Always active
The technical storage or access is strictly necessary for the legitimate purpose of enabling the use of a specific service explicitly requested by the subscriber or user, or for the sole purpose of carrying out the transmission of a communication over an electronic communications network.
Preferences
The technical storage or access is necessary for the legitimate purpose of storing preferences that are not requested by the subscriber or user.
Statistics
The technical storage or access that is used exclusively for statistical purposes.The technical storage or access that is used exclusively for anonymous statistical purposes. Without a subpoena, voluntary compliance on the part of your Internet Service Provider, or additional records from a third party, information stored or retrieved for this purpose alone cannot usually be used to identify you.
Marketing
The technical storage or access is required to create user profiles to send advertising, or to track the user on a website or across several websites for similar marketing purposes.