Using a webcam on a virtual desktop environment can be easy. Or it can be tricky! Read on to learn about highs and lows and what a VirtualCam has to do with it…
Where I work, we get confronted with lots of users who got their own ideas and requirements. Usually in IT, one would enforce a concept or a policy but this is not always the best solution.
For example in this case, we gave some users a mobile device (Laptop) installed with IGEL OS 11 as a thin client. The requirement that has just reached me, was to be able to use a webcam in a browser based video conferencing app. Sounds simple, huh?
The main problem without VirtualCam User Settings
On a thin client, users are usually connected to a virtual desktop environment – In our case Citrix Virtual Apps and Desktops. You do usually also not want to spend too much bandwidth on transferring video data. This is especially true for mobile clients which might access the system from external locations through an ADC (NetScaler) where you license bandwith.
The solution to this any many more issues (Buzzword: GPU requirement) is offloading.
Optimized Apps using Citrix Virtual Channel
The most common video conferencing providers like Cisco (WebEx) and Microsoft (Teams) have elaborated ways to split using their apps in a server- and a client component. This is very cool but unfortunately in our case the application was different. It’s a HTML5 app.
Browser Content Redirection
The second idea was to use Citrix Browser Content Redirection (BCR) to offload the whole webpage to the client OS. Long story short: The Application was unable to even start. The scripts were too complex to be redirected. We failed with about a thousand javascript errors.
The final solution: Citrix HDX Camera
The “fallback” is redirecting the video. Fortunately our Terminal Servers have decent GPU cards installed which allows us to process video very efficiently. Because of this, we “only” needed to enable HDX Camera Redirection. After some struggles in the first place (which were citrix policy issues) we managed to redirect the camera using this basic citrix feature quite well and it works as expected.
So far, so good…
Here comes: The User!
So initially I told, that we got some special requirements… There you go: It didn’t take long until someone figured out that their cam was actually not working as expected.
What happened?
During the pandemic we were forced to buy several different webcams as availability was a problem. So now we got about 5 to 10 different camera models plus integrated cameras in some devices. In the end a user might even have two or more cameras available, but HDX only redirects the “primary” camera (as in the first one enumerated). And this was always the integrated laptop camera for us.
How we solved it using VirtualCam
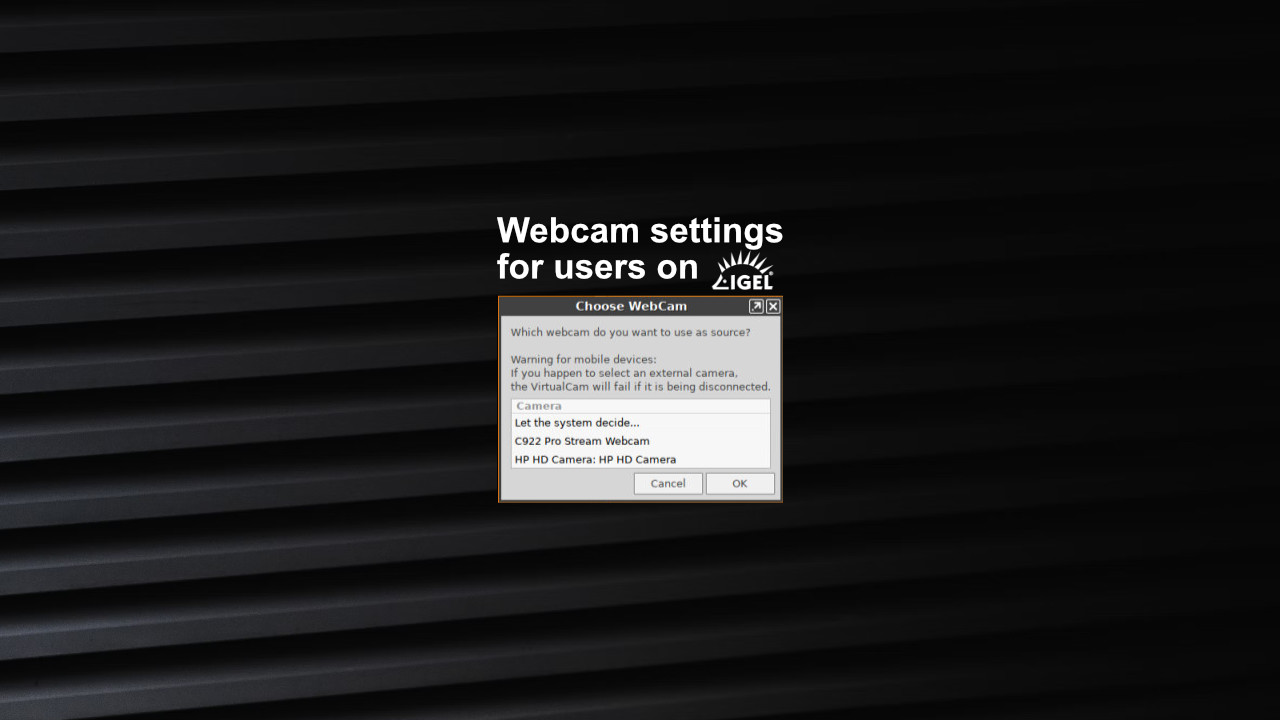
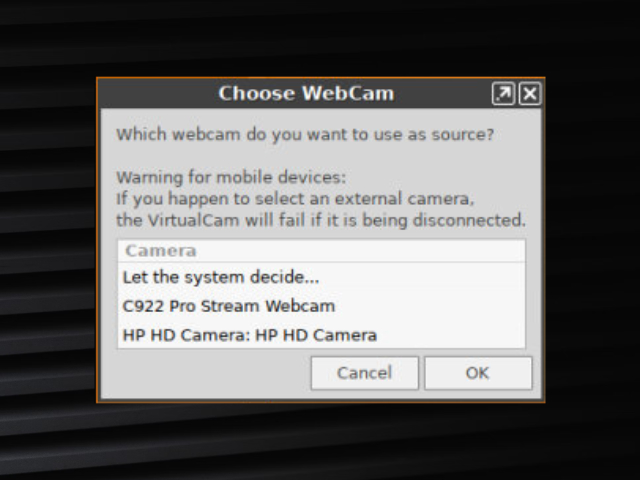
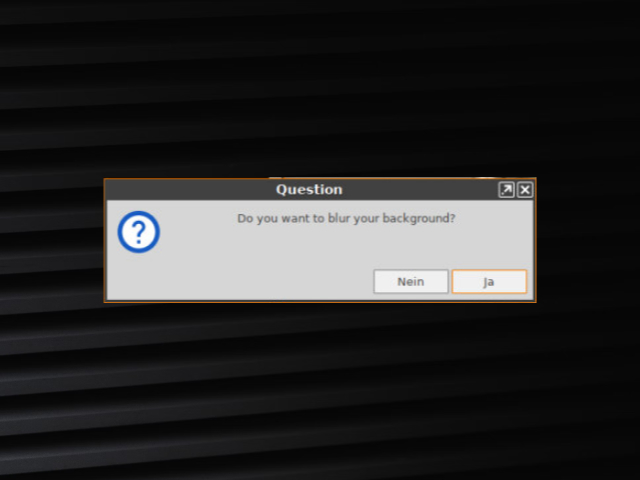
IGEL luckily just introduced the “Virtual Camera Background” feature in IGEL OS 11.08. This not only allows to blur the background for any application. It additionally provides a registry setting to set the camera source to a specific camera (by name, number or VID/PID). Then it replaces the main camera by the virtual one. This VirtualCam is then redirected by Citrix HDX.
This was the basic solution but we would need to configure the camera for every single client using the registry. While possible, that’s an annyoing sysadmin task. Additionally, a mobile user are changing workplaces from time to time. They are then often forced to use a different cam (like integrated on mobile, monitor cam at their desk).
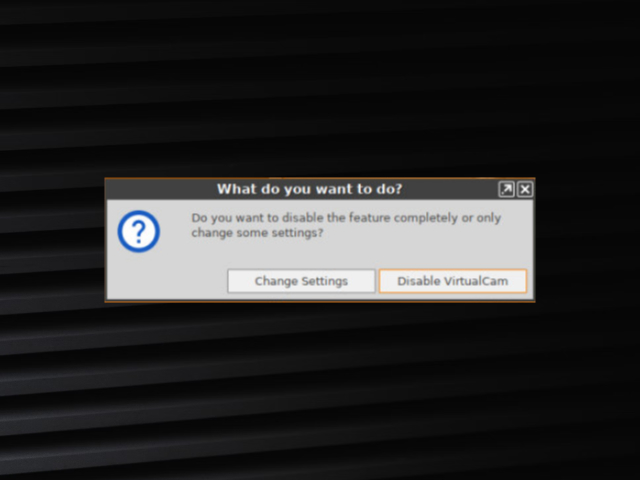
Power to the user – Let them control VirtualCam settings!
I created a script that can be deployed to an IGEL Thin Client and linked as a custom application to allow the user to toggle and configure the VirtualCam feature.
All you need, is a basic profile to configure the Custom App and the basic VirtualCam parameters. The shell script I wrote contains the required logic.
The profile creates a new Folder on the desktop called “Settings” and puts a link in it, called “VirtualCam”. You might want to change that under desktop integration.
Work Done!
Are you using uncommon video conferencing tools, too? If yes, which and did you already encounter such a situation yet? How did you solve it?
I was recently confronted with the issue that I needed to move a running Proxmox Backup server to a new host. Along the migration I also needed to update the hostname to match the new concept. However, it does not really matter if you keep the hostname or not as fortunately PBS does not really care about it’s name.
Step 1: Research
As a senior admin I know you can usually find out anything you don’t know yet using google (ar any other search enginge out there). This time however I had a hard time. Looks like virtually nobody tried to migrate a PBS yet – or maybe the fact tht it is so easy leads to noboy writing the process down.
Okay, let’s do it on our own!
The Facts
Currently PBS is running an an “old” Proxmox VE host – and I mean on the physical host. We are migrating this PBS installation to a dedicated host, a VM on Hetzner’s cloud this time. As the PBS is only occasionally taking load and the backup performance does not really matter for our project, I chose a CX21 VM with 2 vCores and 2GB of RAM. The 40 GB HDD space are enoght for the OS and PBS’s own files. Additionally a Hetzner Storage Box is available to be used as the actual datastore.
In this case the chunks (the actual backed up files) have already been stored to the Storage Box. This means in this blog post I will not migrate the actual data but if you need to, it is as simple as rsyncing the data (rsync -azh source target) from one place to the other, just take care that the mount path is the same on the new server and stop the services on both servers before migrating!
Step 2: Preparation
The Cloud VM
First of all, I booked a CX21 cloud VM from Hetzner located in the same datacenter as the storage box resides. This is very important! Using a VM in FSN1 and storage box in HEL1 has very bad performance. I mean performance like when you’re driving right behind a farm tractor on a highway.
I chose Debian 11 (and you should do so, too). Right after the setup completed, I logged in using SSH and edited /etc/hostname to include or FQDN hostname – don’t forget to add a DNS entry!
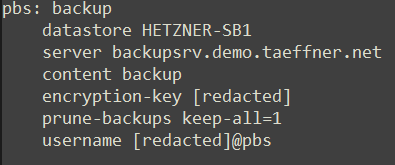
As mentioned, our chunk data is stored on a Hetzner Storage box. I copied the respective line from fstab from the old server to the new one and created the mount path using mkdir /mnt/hetzner-sb1 in my case. For reference, this is what it looks like now (username/password redacted):
Then I mounted the box using mount /mnt/hetzner-sb1 and verieifed by running an ls /mnt/hetzner-sb1
Install Proxmox Backup Server software
We need to do a clean install as docuemnted here. The commands are simple and reliable:
Trust the repository key: wget https://enterprise.proxmox.com/debian/proxmox-release-bullseye.gpg -O /etc/apt/trusted.gpg.d/proxmox-release-bullseye.gpg
Add the repo to apt sources: echo "deb http://download.proxmox.com/debian/pbs bullseye pbs-no-subscription">/etc/apt/sources.list.d/pbs.list
Download package lists: apt update
Install the software: apt-get install proxmox-backup
You could also install proxmox-backu-server instead of proxmox-backup. The proxmox-backup package contains all recommended extra packages, the other onwe is a minimal setup.
Disable 2FA temporarily
If you can, you should remove 2FA configuration from the root user before migrating or create a new administrative user without 2FA if WebAuthN is used. Else you might not be able to log in anymore.
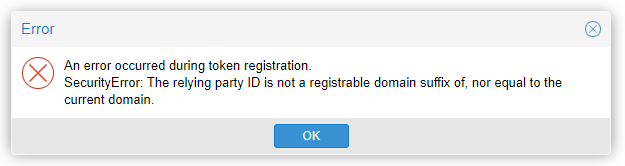
If you are changing the hostname along the migration like I do you are required to deconfigure WebAuthN and reconfigure it after migration as the hostname is the "key" for WebnAuthN accounts on the token.
Stopping services on old and new server
It is important that no backups or other jobs are running while you are migrating. Run these commands on both servers:
service proxmox-backup stop
service proxmox-backup-proxy stop
Make sure that no job or task is running before stopping the services.
Step 3: Migrate config and metadata
Proxmox backup server stores its configuration in /etc/proxmox-backup and metadata (rrd stats etc) in /var/lib/proxmox-backup – We need to sync both folders to the new host (assuming the new host has IP 10.10.20.20) using rsync on the old host:
To make sure all configs are applied and all services are running smoothly, we will now reboot the new server and verify our installation and migration.
After the reboot, visit https://10.10.20.20:8007 (use the IP-Address for now)
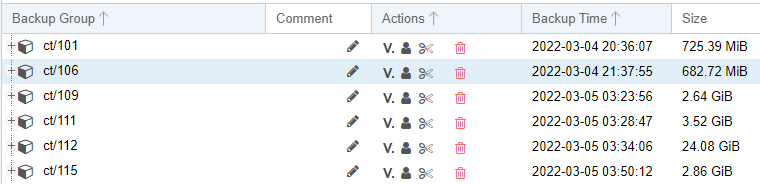
You whould see your datastore on the dashboard now – including historical usage data graph. If so, select the datastore on the left hand menu and select the content ribbon. You should see all backups there. This might look a bit like that:
Great! The worst part is over. If you preserved the hostname, you’re done and can proceed to step 7.
Step 5: Configure SSL
This step does not apply if you keep the hostname while migrating.
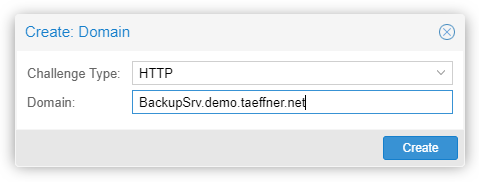
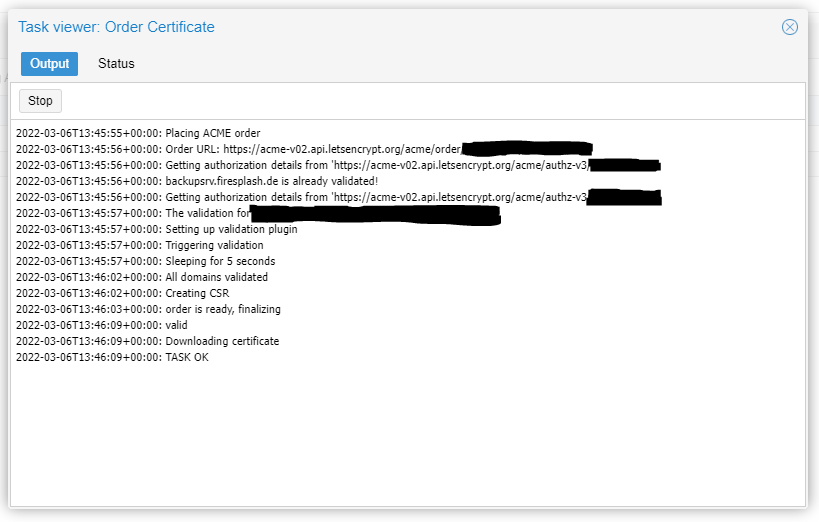
Now you will need to setup Let’s encrypt again (or use your preferred method). You can do this at Configuration -> Certificates. Simply click the add button and enter yor FQDN there:
You may also want to remove the migrated old certificate. Then click the “Order certificates now” button. If everything runs smoothly, you should now have a valid SSL-certificate:
Verify this by pointing your browser to https://your-hostname.your-domain.tld:8007/
If the certificate is no used immediately, restart the proxmox-backup-proxy service
Step 6: Configuring the clients
This step does not apply if you keep the hostname while migrating.
Now you have to direct your clients to use the new server. For manual backups using proxmox-backup-client you need to edit the cronjobs or backups scripts. For Proxmox VE you can simply edit /etc/pve/storage.cfg (for example using nano) and change the “server” directive of the storage block:
Proxmox VE will reload the changed file automatically after a few seconds.
Step 7: Testing
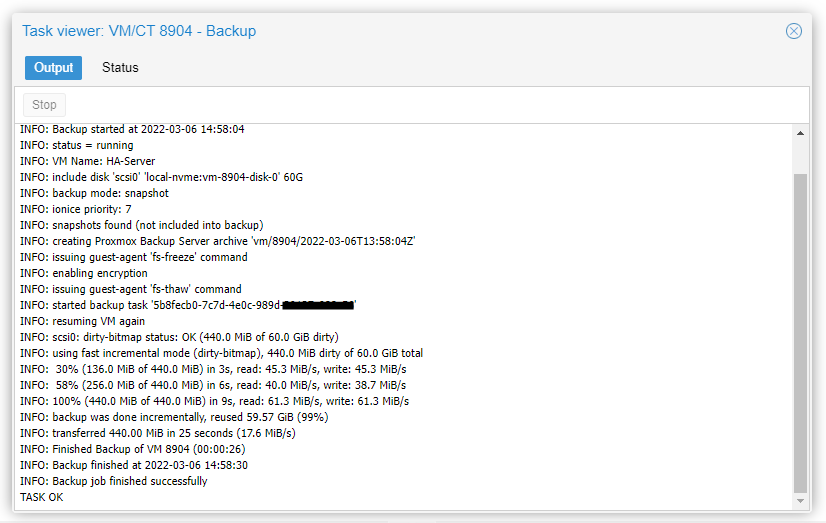
You should try to backup a client to see that everything works. In my case I ran a manual backup from my Proxmox VE server:
While the backup is running, you will also see that in the "Tasks" bade on the top right corner of your PBS server.
Done!
You should monitor your upcoming backups and verfiy them using PBS’ builtin verifications to make sure all chunks are accessible, especially if you also migrated the chunk storage.
Also don’t forget to re-enable 2FA if you disable dit before….
…and if you changed the hostname, you have to reconfigure WebAuthN under Configuration -> Other (and the other is located at the top if you click on Configuration – The did a good job in hiding that!)
I hope you were able to follow my steps to successfully migrate your PBS installation in a rush. Tell me, did you encounter any issues?
Manage Cookie Consent
Wir verwenden Cookies, um unsere Website und unseren Service zu optimieren.
Funktional
Always active
The technical storage or access is strictly necessary for the legitimate purpose of enabling the use of a specific service explicitly requested by the subscriber or user, or for the sole purpose of carrying out the transmission of a communication over an electronic communications network.
Preferences
The technical storage or access is necessary for the legitimate purpose of storing preferences that are not requested by the subscriber or user.
Statistics
The technical storage or access that is used exclusively for statistical purposes.The technical storage or access that is used exclusively for anonymous statistical purposes. Without a subpoena, voluntary compliance on the part of your Internet Service Provider, or additional records from a third party, information stored or retrieved for this purpose alone cannot usually be used to identify you.
Marketing
The technical storage or access is required to create user profiles to send advertising, or to track the user on a website or across several websites for similar marketing purposes.