
Provider Comparison – Low Budget Cloud, Part 1
A new journey
Hi, I am Alex. I am doing my own way of setting up my “business-IT” for my own “company” Firesplash Entertainment. You ask why? As a sole-proprietor who turned his hobby into a small business, availability counts (we are serving a cool overlay game running on twitch) but budget also does. I am known as someone who loves simple solutions that are actually manageable and payable for a normal (as far as IT people can be) human person. So, welcome to my Think-Outside-The-Box HA Cloud project Number two. Let’s start with a cloud provider comparison…
Err.. Wait.. The Hetzner Hybrid Cloud Project..?
Did that introduction sound quite familiar to you? Yep. It’s me. Some time ago I started creating a series on my friend’s blog where I described how we set up a hybrid cluster on Hetzner. It consisted of two hardware dedicated servers and a cloud VM used as quorum and router. We used HCloud Floating IPs and routed them over a GRE connection using OpenVSwitch. Yes, it worked. But it had quite some pitfalls I was never able to solve – for example for some reason the complete GRE-Tunnel dropped when I added a third node. The original plan was to move to cloud networks connected to vSwitches but Hetzner did not implement IPv6 for this feature (funny as they recently announced IPv6-Only servers…).
This simple setup did still cost us about 130€ per month and the nodes were idle most of the time in the end. Further Hetzner recently dropped highly availabe Cloud VMs (CEPH-Based) which are a breaking point for the concept and they raised their prices for IPv4 addresses again (including existing customers).
When I finally noticed that my Kubernetes-Cluster needed a major OS upgrade, that was the point for me to simply toss the existing solution and start elaborating a better solution.
The Idea
I always had an eye on Hetzner’s latest features on their cloud platform. They added Load Balancers, Firewalls, private networking (still only IPv4), … That basic stuff that turns a provider to a real cloud provider, you know?
For me it’s been time to check if I can migrate all my workload from my dedicated servers into the cloud. The original plan was to cancel my two dedicated servers, consolidate some VMs into fewer ones on hetzner’s cloud.
Maths – Calculations for a good Provider Comparison
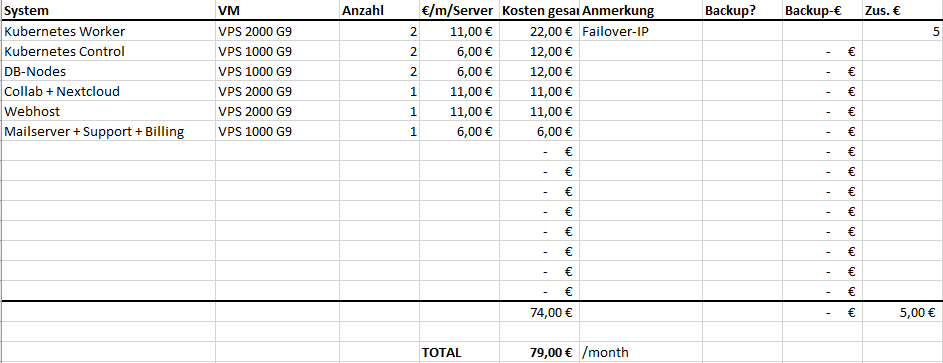
Of course you always have to look at the expected cost – especially when talking about modern cloud providers, things can become wuite expensive very fast when you got non-cloud-native workloads. So I created a quick table to calculate my expected cost which shall help us on our cloud provider comparison. First of all I defined my new VMs including their sizing. I ended up with something like that:
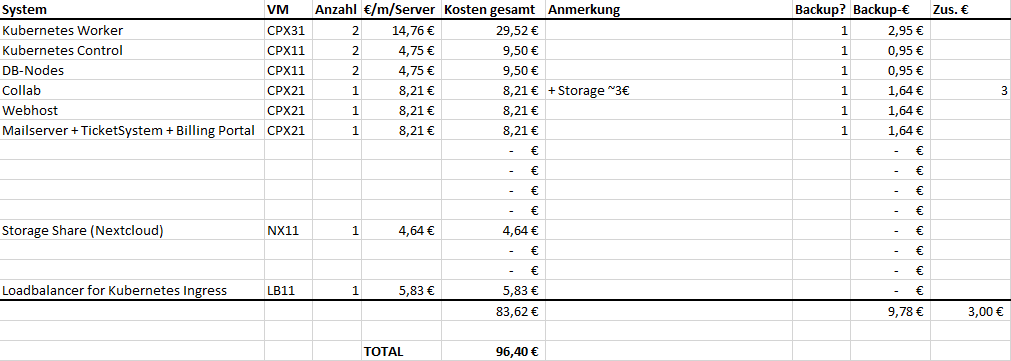
As you can see in this table, I calculated including hetzner’s backup offerings. For further comparison we will take the ~86€ without those backup costs – But we will likely use another backup solution for our final systems. Also the calculation might not be 100% accurate because I think that backing up the additional volume on Collab (GitLab-Server) will cost extra.
Other Options
I also checked a few other options like moving our Kubernetes-Workloads to AWS, GKE, … And also OVH and other server providers.
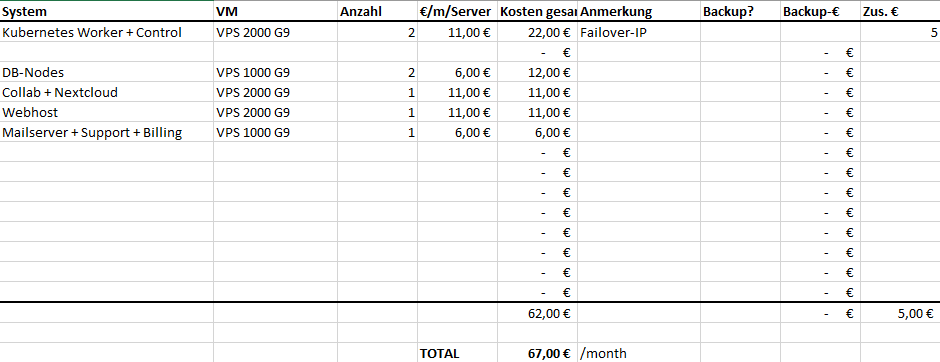
One of these providers showed a very good pricing. Hello netcup! I will now show you my second calculation, including the same workloads – except the backup feature. Also the Loadbalancer has been removed and is replaced by a floating IP (which would also work on hetzner, saving us about 4€, but more details in the next part)
So at the first look the price difference is minimal. Talking about 7€ difference while Hetzner Cloud does definitely have the better user interface and UX. Also netcup’s prices are only valid for 12 month minimum contract period subscriptions while hetzner allows per hour billing.
Provider comparison results: Why netcup is still the better choice for me
If I would see this cloud provider comparison in it’s current state, honestly… I would say “go along with Hetzner“. But of course there is a difference. The VPS 2000 G9 of netcup has double the ram compared to a CPX31 on Hetzner. Same goes for most of the “machines”. Almost every single VM on this list has more power than on the hetzner table. Also local storage is much bigger which enables us to use Persistant Volumes on our Kubernetes Environment. So in the end you get a lot more bang for your buck there.
When we add our “Think-Outside-The-Box”-Manner we can violate a best practice and converge the control planes into the worker nodes (because those now got more than enough RAM). This is a security consideration but we don’t allow third parties to manage worloads on the cluster so we know what is running on it. It’s a risk I am willing to take.
You might have further noticed that I converged the Nextcloud instance which was planned as a StorageShare on hetzner into the Collab server – This is actually our current setup and is now possible because of the bigger HDD and RAM sizes on netcup.
So all put back into the table we actually end up with a saving of about 19€/month (thats 228€ per year!) while still having more ressources available for our workloads. Isn’t that awesome?
Completing the concept – Adding backups
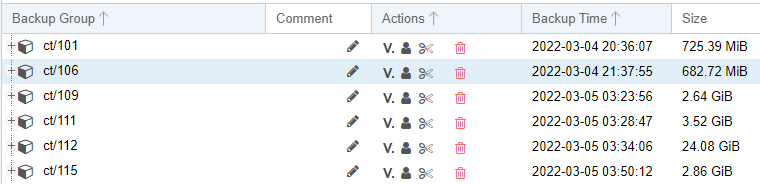
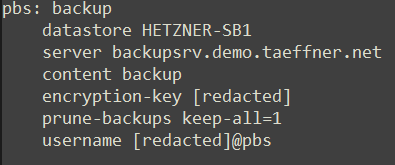
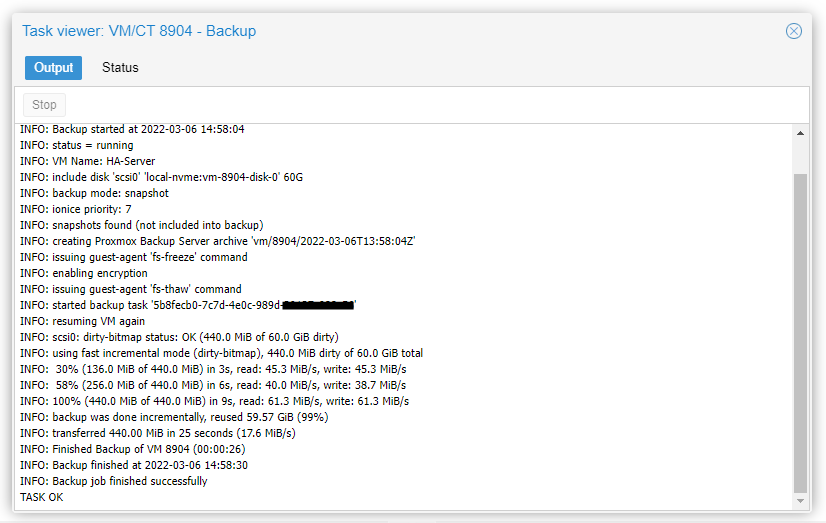
Still, we need a backup strategy. We did not honor this for our cloud provider comparison as in the end that cost ist quite identical for all solutions. Right now I have not decided which way we will go here. Hetzner recently changed their storage box model to provide more storage for less. Unfortunately they still do not support NFS… We might want to use Proxmox Backup Server for our backups as we got quite good experience with it and the pbs-client also allows us to backup “foreign” vms. PBS allows us to do a complete partition-dump from inside the vm – Other way round we can quickly restore a full VM out of a live linux or only a few files locally if required. Also it does a good job on deduplication – and I mean not only per VM!
Proxmox Backup Server has minimum server requirements of 2+ cores and 2 GB RAM. We currently need about 450GB backup storage but I expect that to be a bit more as we will not backup images but filesystems from now on which is a bit more inefficient.
- All-Hetzner classic solution
- StorageBox 1TB (BX11)
- CloudVM CPX11
- Total cost: 8,20€/month
- Implication: Backup traffic goes directly from our prod VMs to external IPs
- All-netcup
- S 1000 G7 (1,5 TB, only 1 vCore)
- Total cost: 15,99€/month
- Implication: We violate the minimum requirements for PBS
- Hybrid
- Hetzner StorageBox 1TB (BX11)
- netcup VPS 500 G8
- Total cost: 8,74€/month
- Implication: Latency between PBS and Storage can cause trouble
There is another option: Borg Backup
Borg does not allow us to backup (and restore) the full VM but is perfect for backing up individual files or folders containing required data.
At this point it is a decision: Do we want (file system) “snapshots” or data backups? Let’s check the pricing. It is as simple as one Hetzner StorageBox BX11 for 3,45€/month because BorgBackup is natively supported.
We still stick to hetzner here as their storage boxes are the cheapest backup solution and I am a fan of having last-resort backups somewhere else… Even if it’s the same city in the end 😉 – But we could also send our storage box to finland.
The big difference…
…is that PBS allows us to quickly restore the system state of our VM. All we have to do (at least in theory) is to setup a new VM (or use the old one), spin up the recovery system, install PBS-Client and restore the root partition (and probably all other partitions) to the mounted disk.
With borg we will still have to install an OS and all the software and then restore all data folders, config files etc using borg. Basically the same what we do while setting up our system + data restore.
Next steps…
At this point I have (had… This article was written months ago actually) not yet decided which backup strategy to go for. What would you do?
In the next part we will start setting up our VMs on netcup. Want to give it a try? I would appreciate if you’d use one of the referral links contained in this cloud provider comparison to support me and Firesplash Entertainment. Also for exploring netcup, I got a 5€ voucher for new customers for you: 36nc16447952840
Upcoming articles of this series will be published with some delay depending on my finding time to actually write the text…